



PAR 41364 M
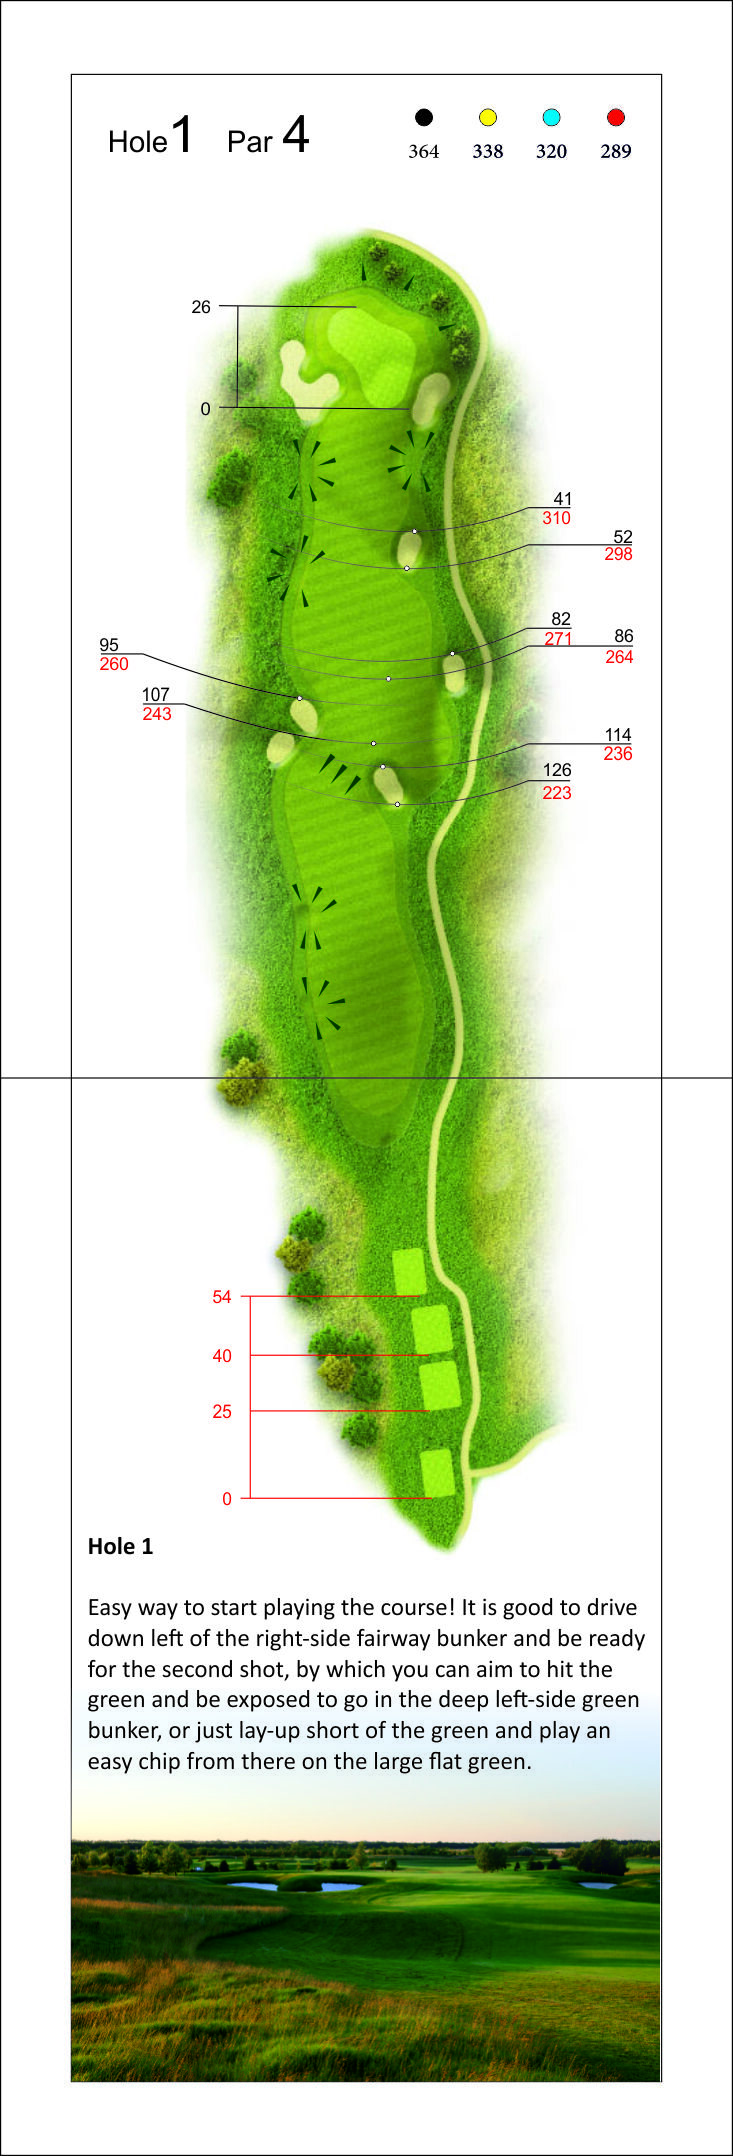
Easy way to start playing the course. It is good to drive down left of the right-side fairway bunker and be ready for the second shot, by which you can aim to hit the green and be exposed to go in…

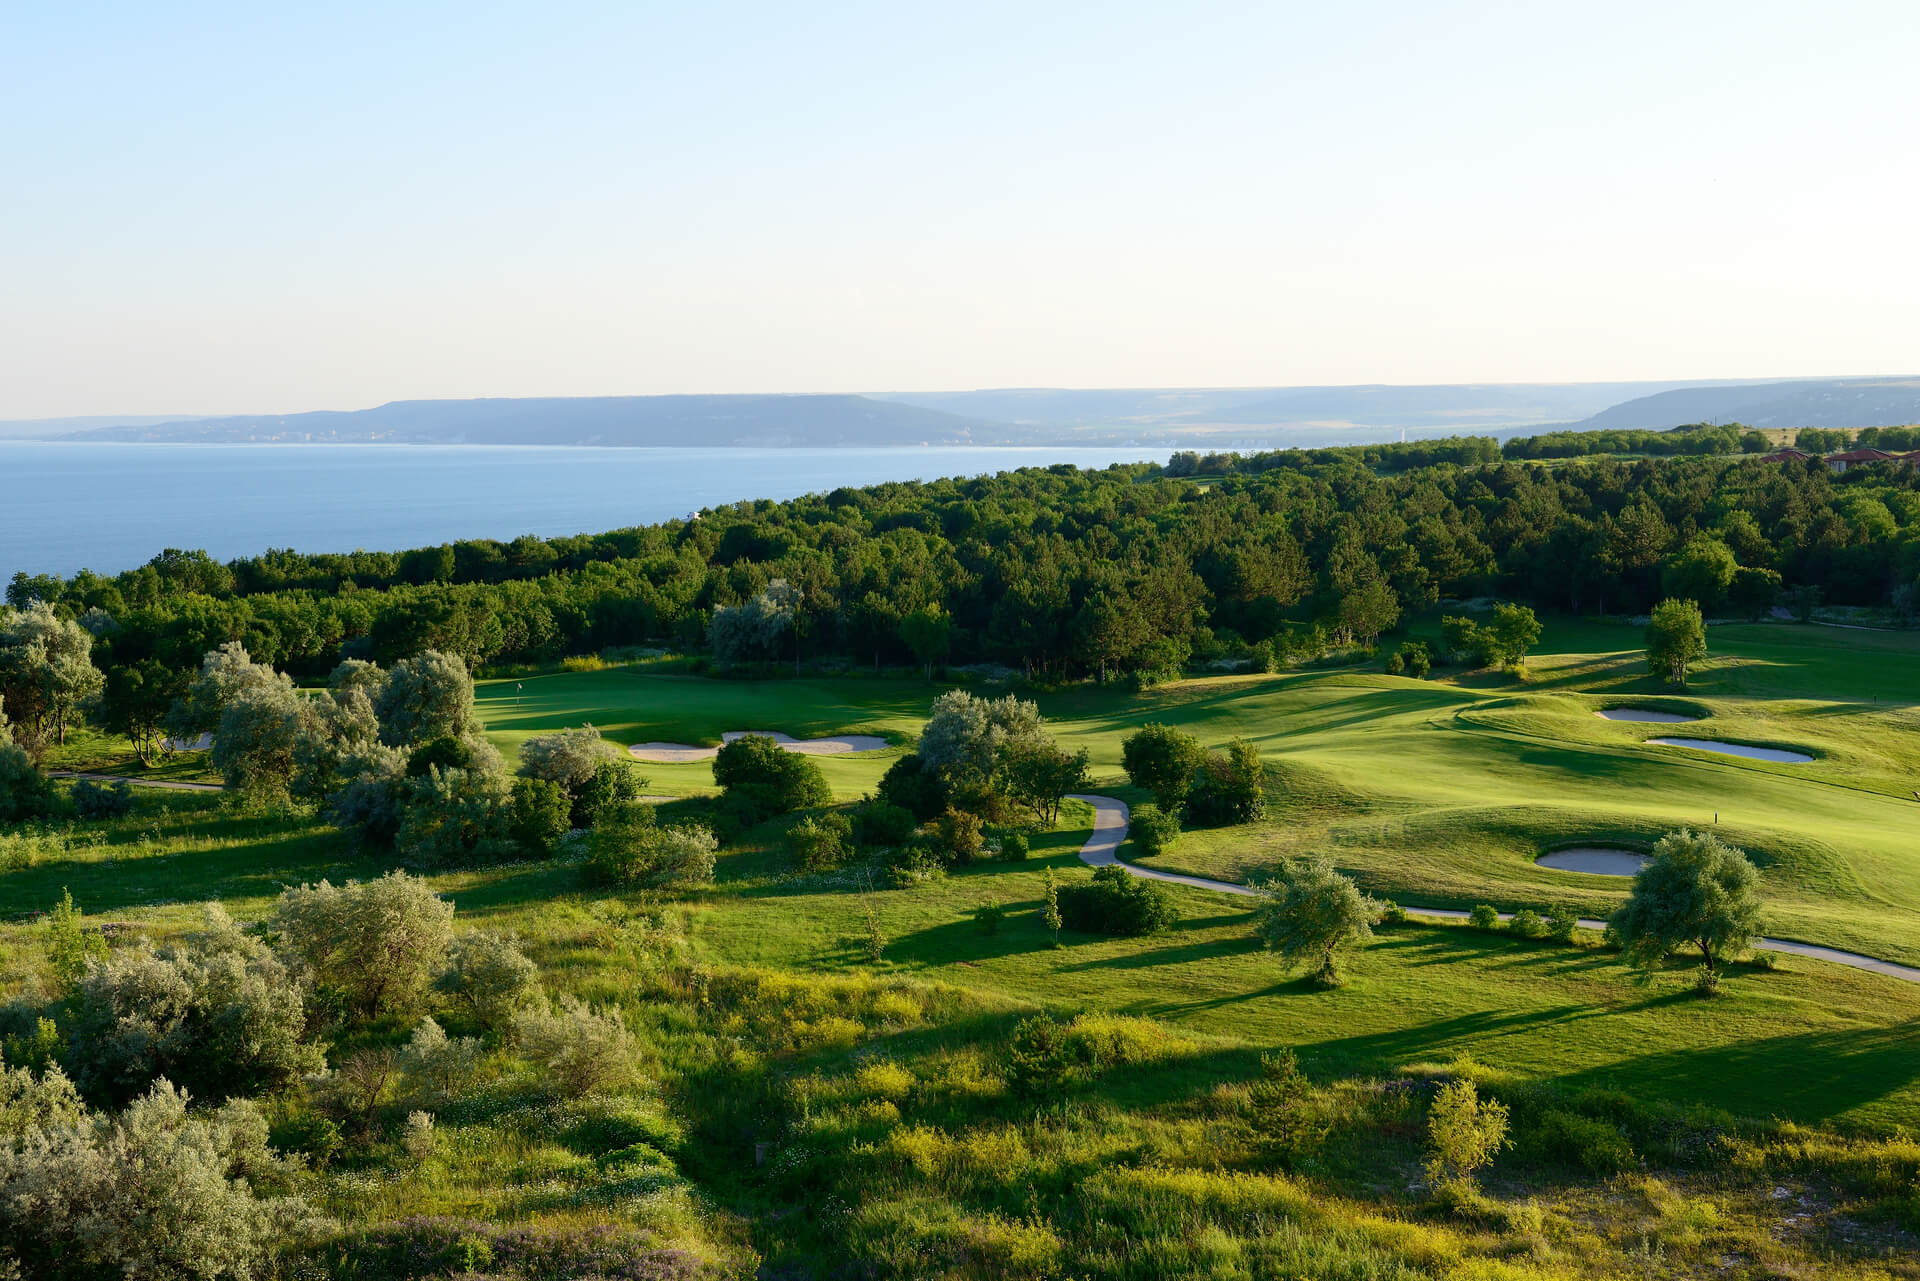
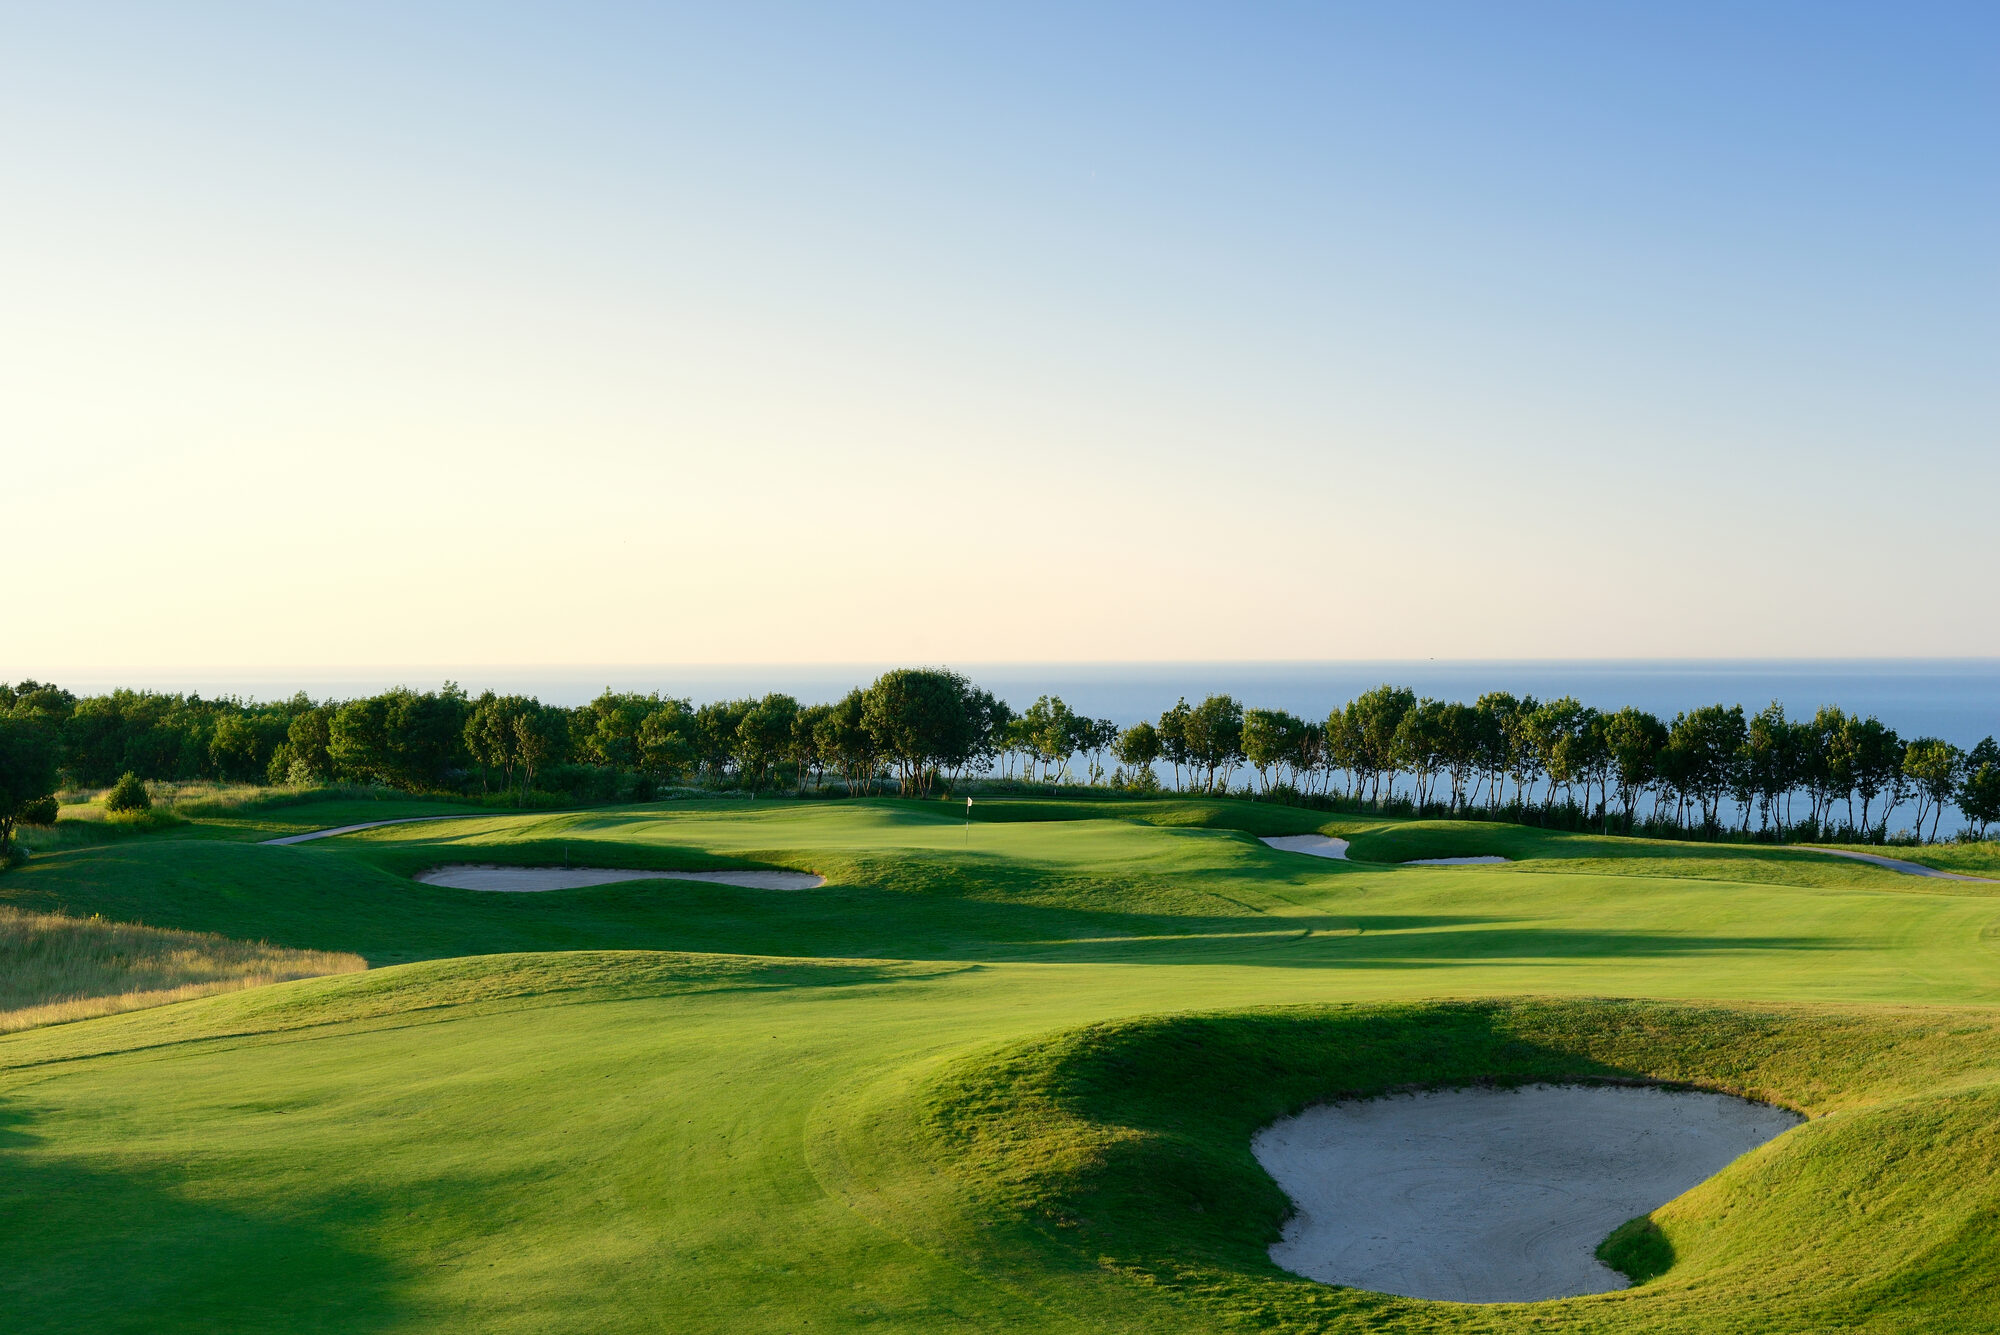
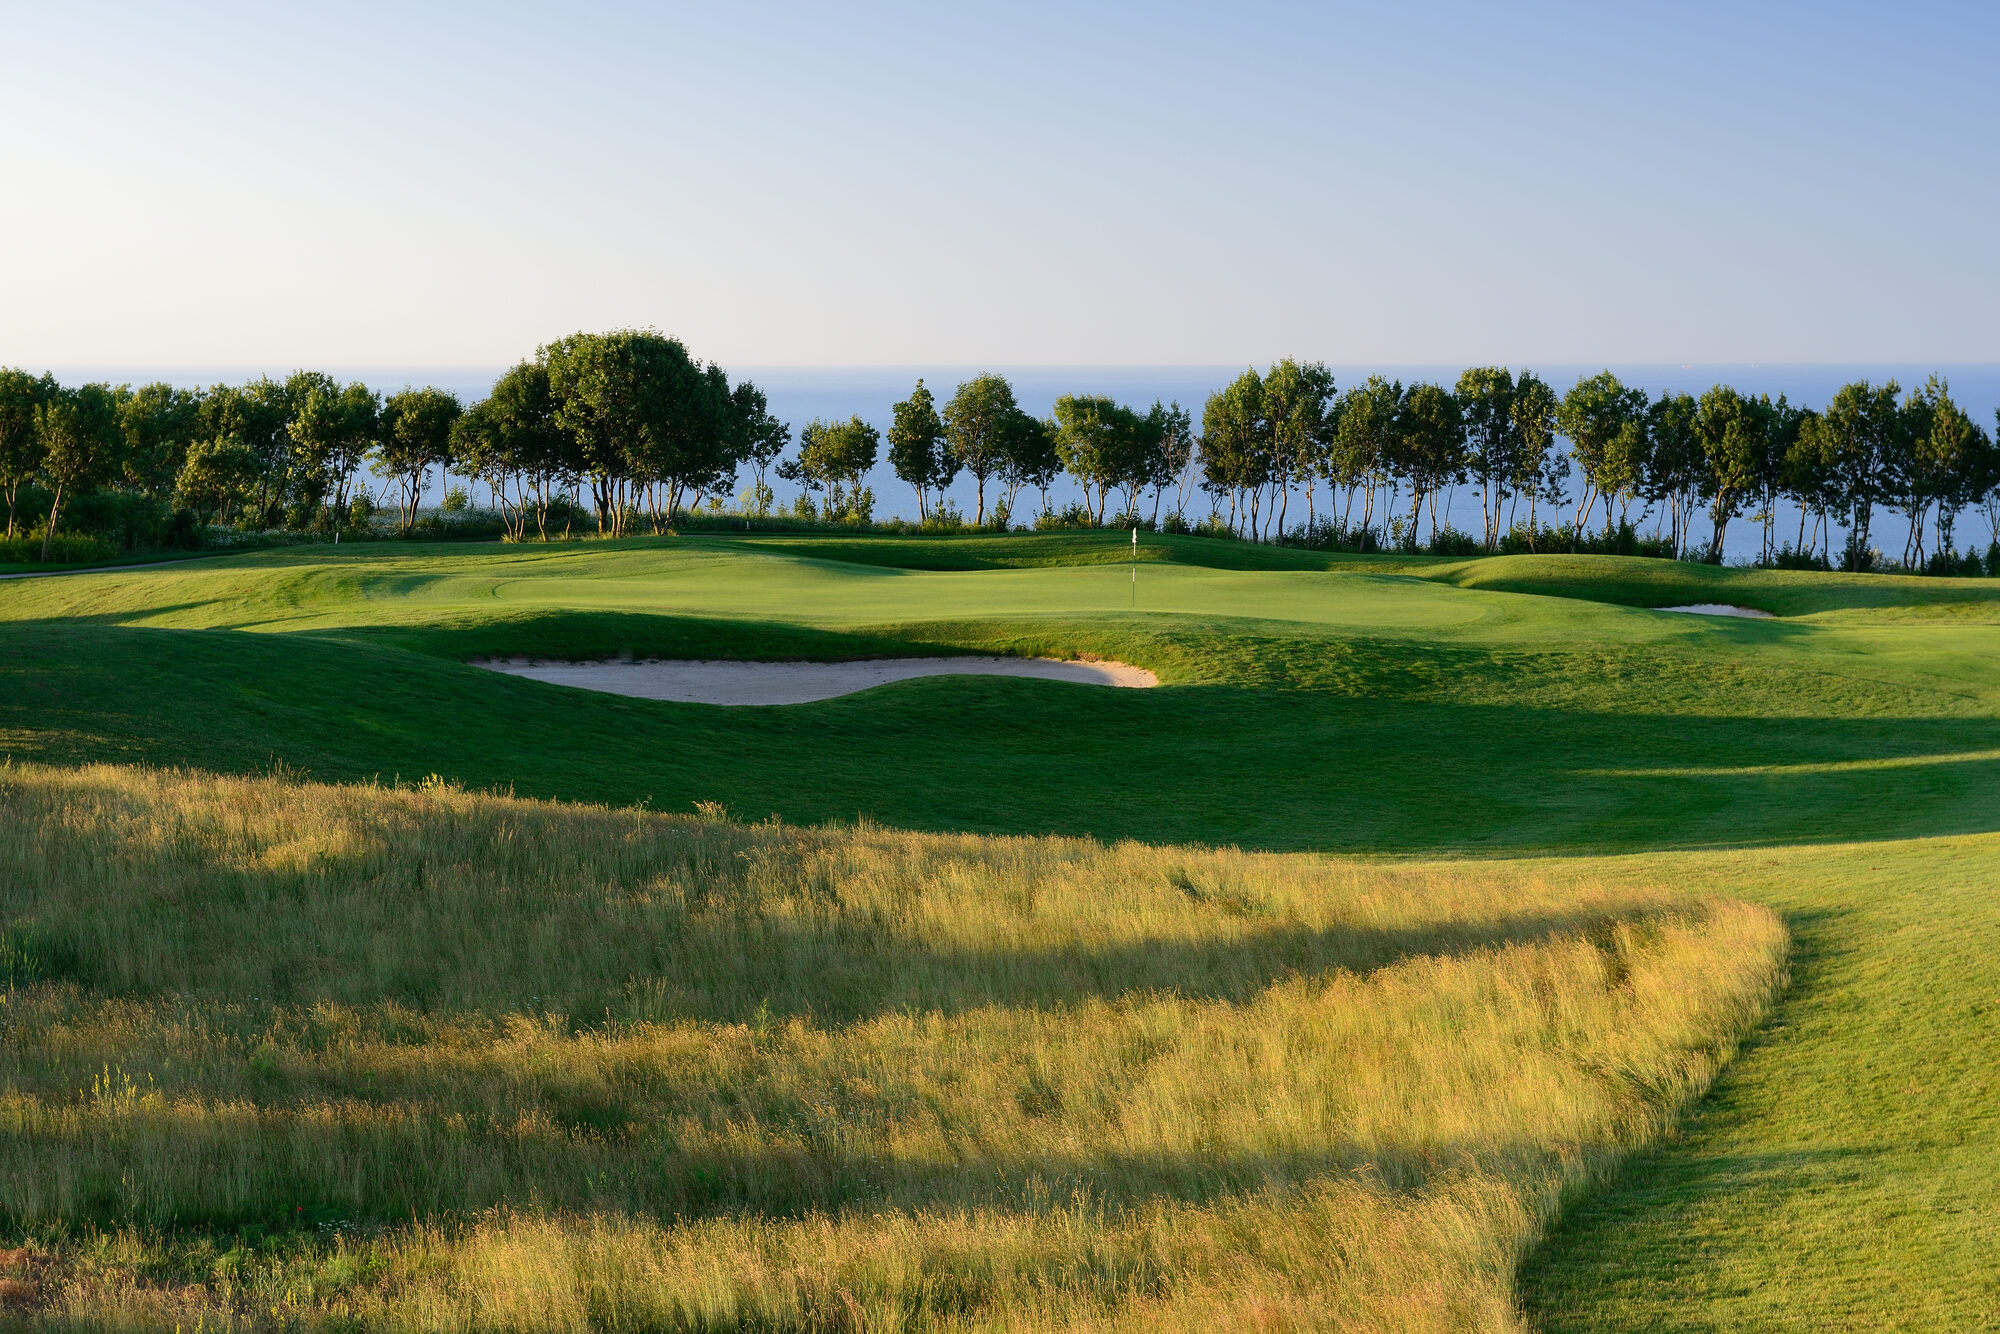
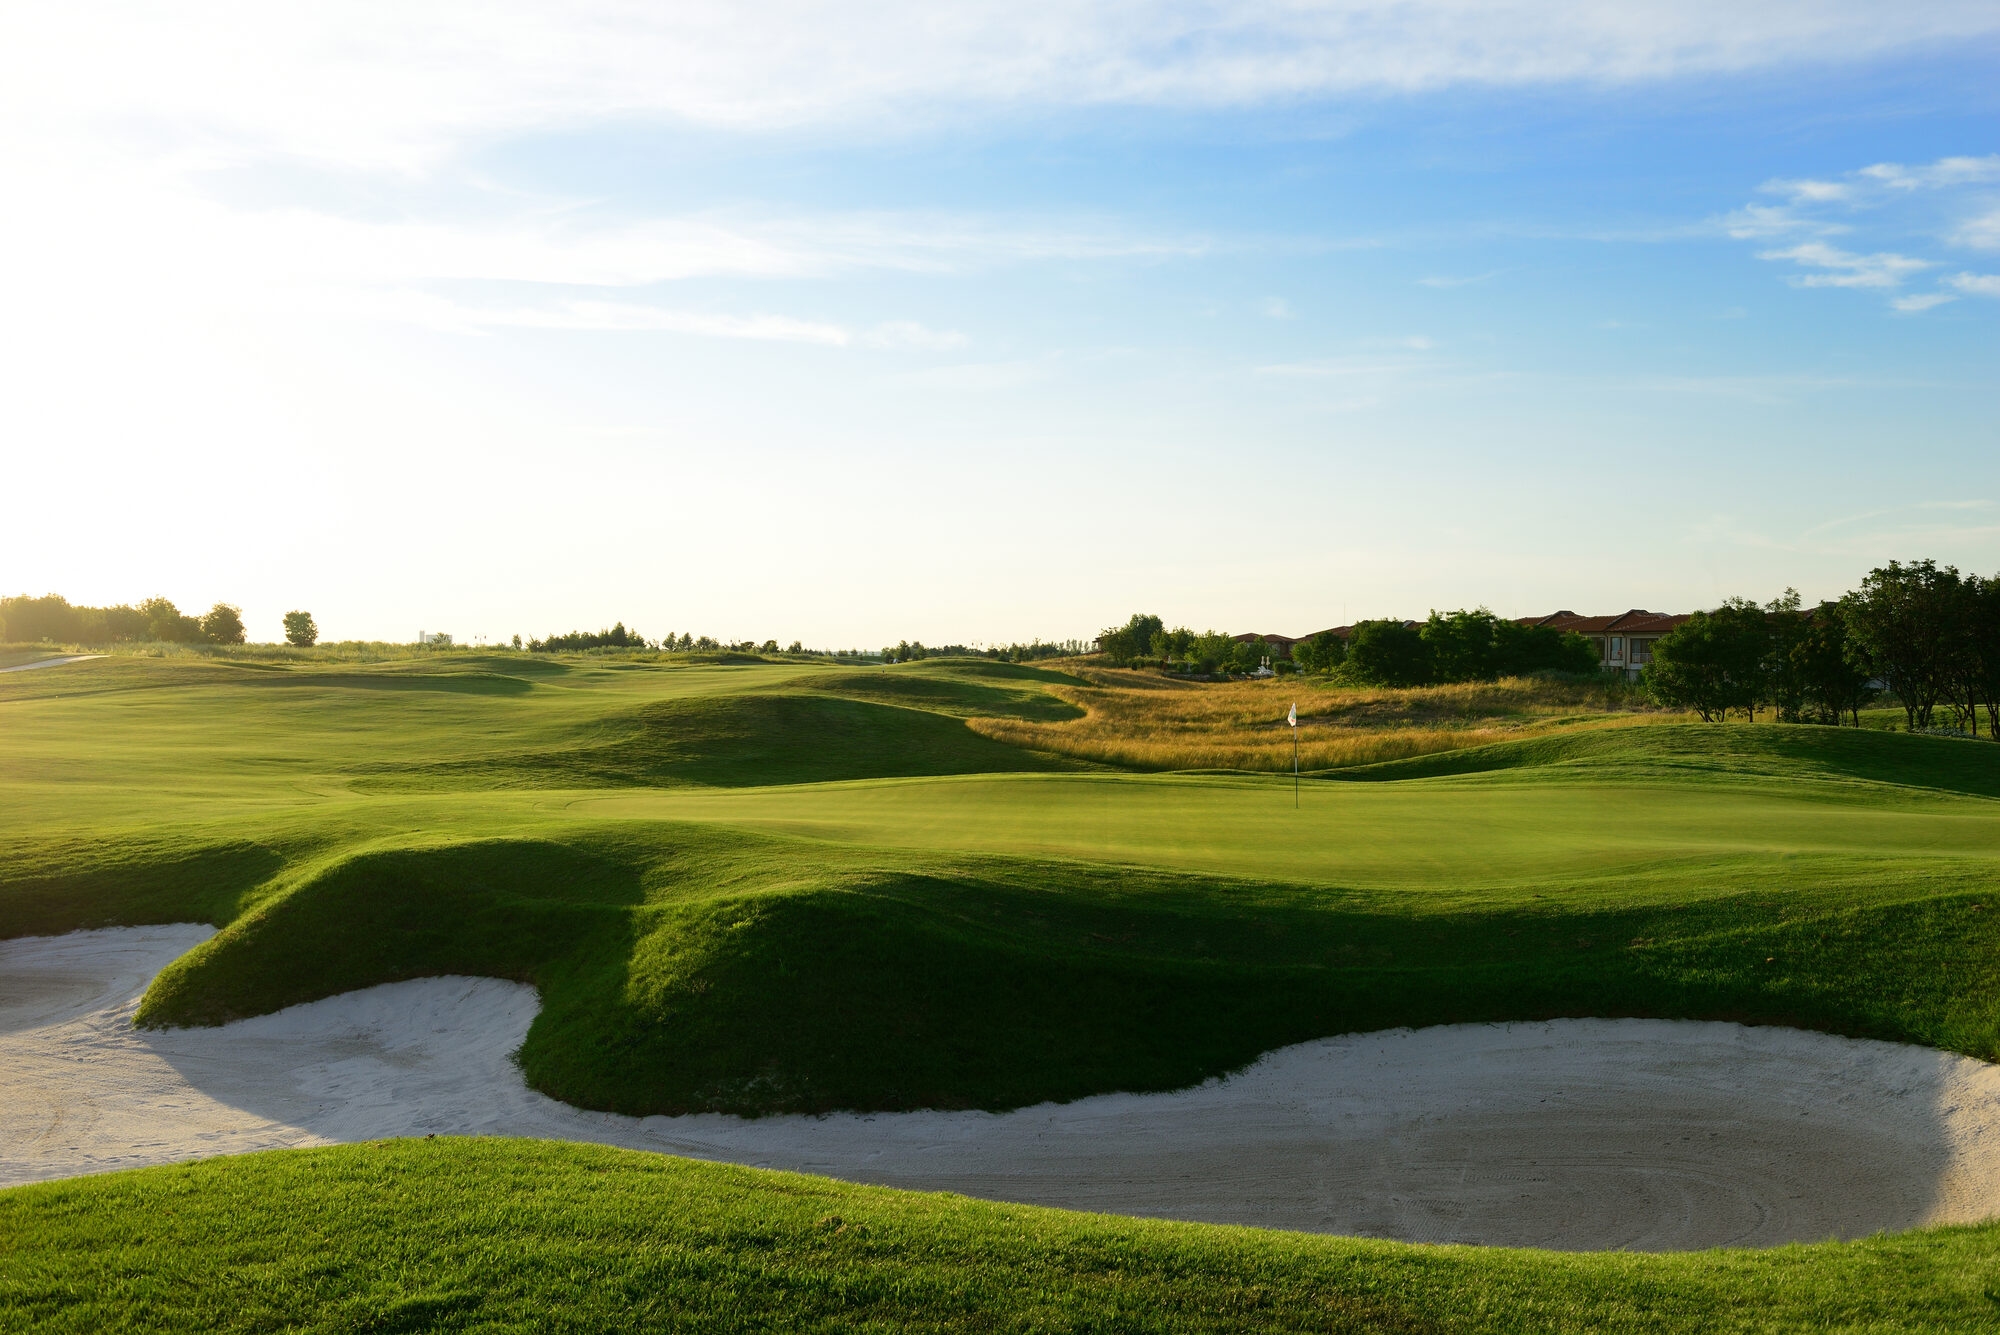
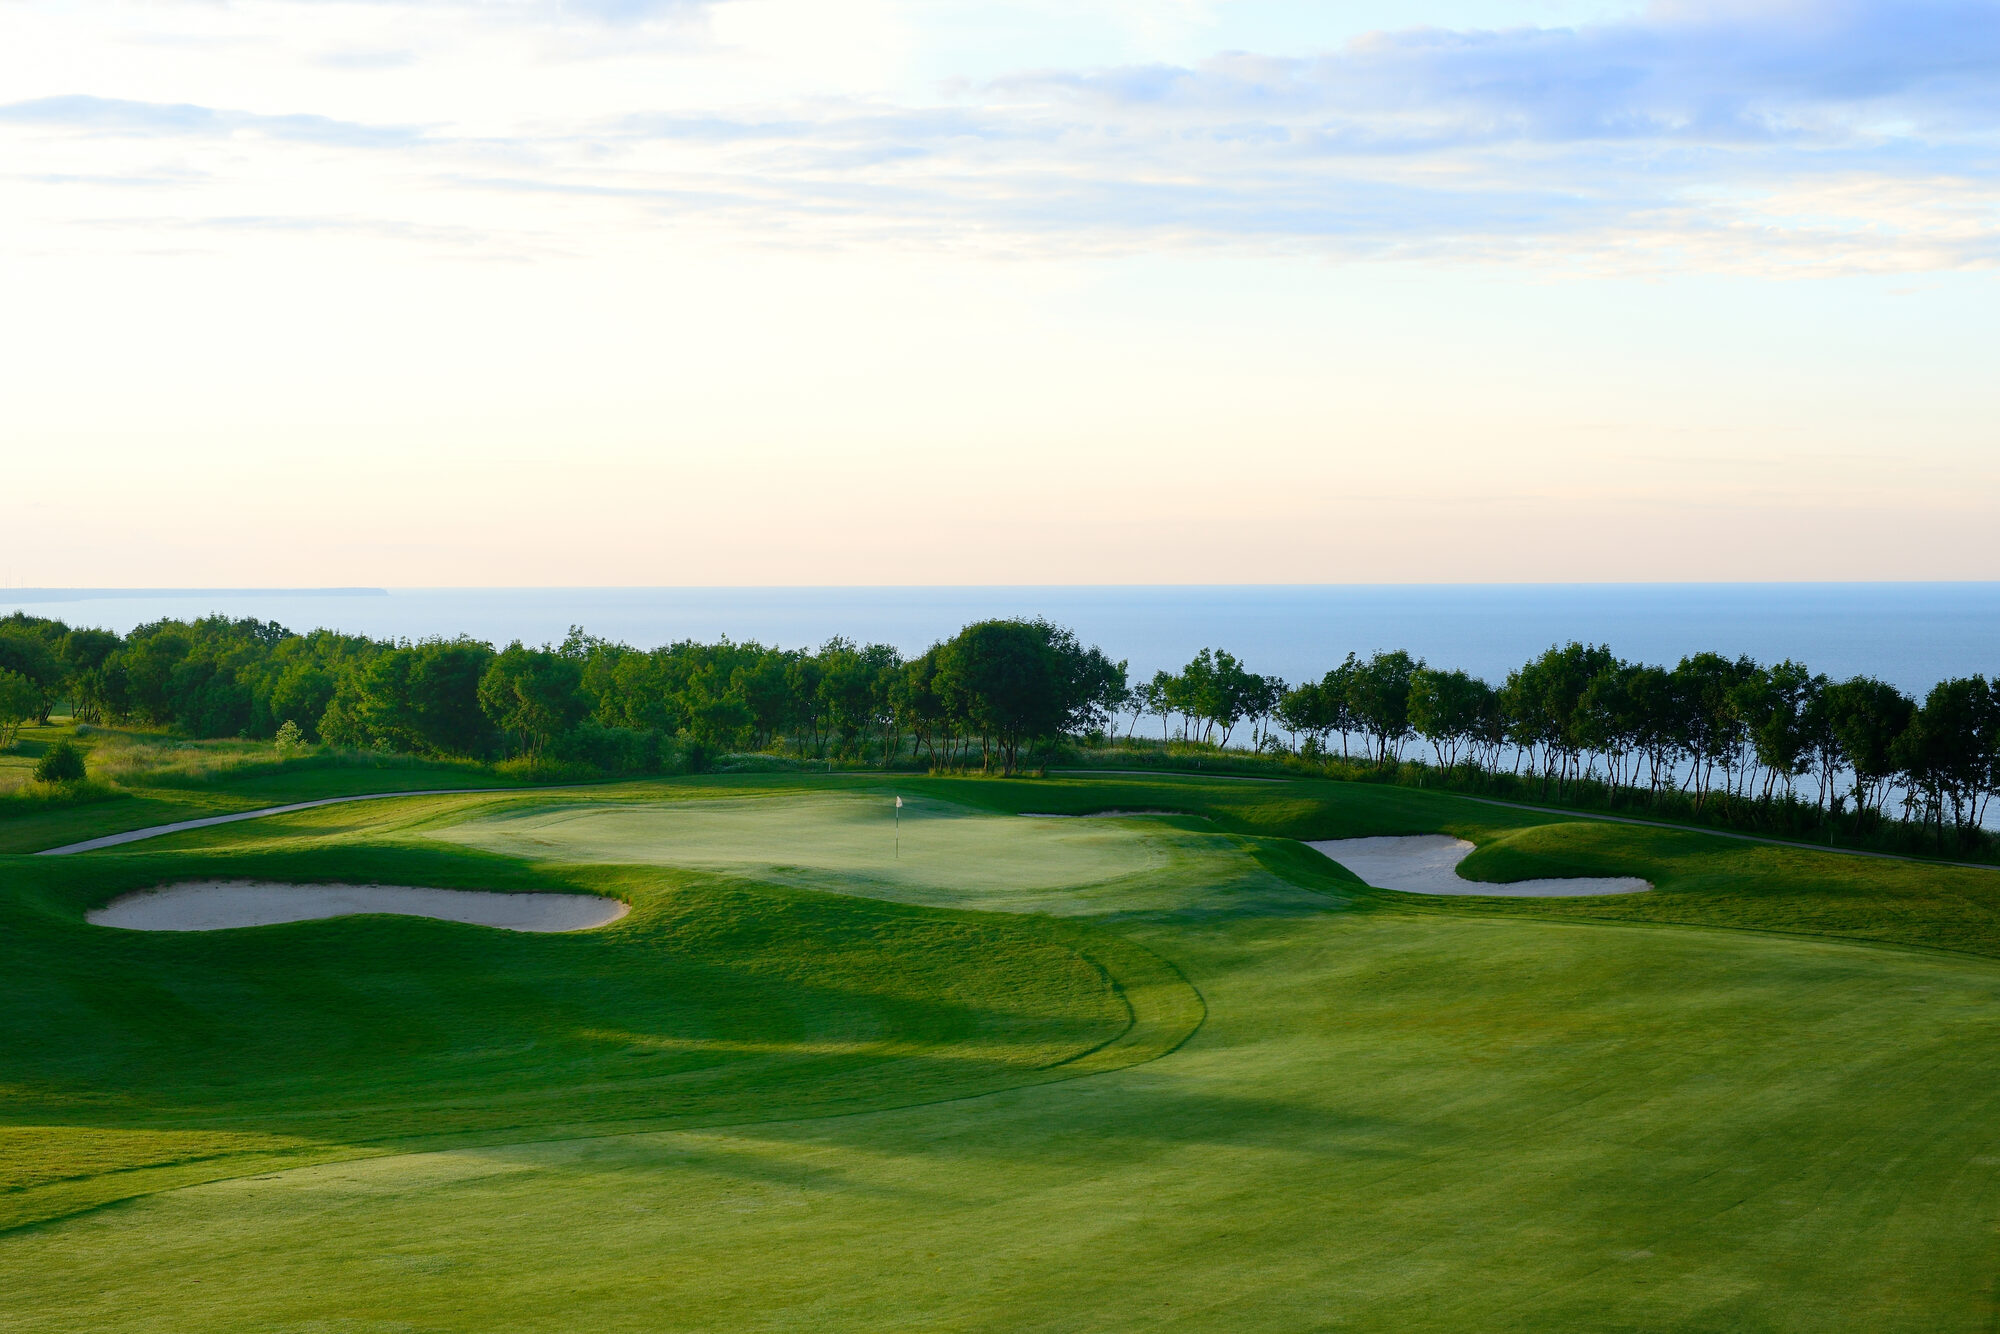
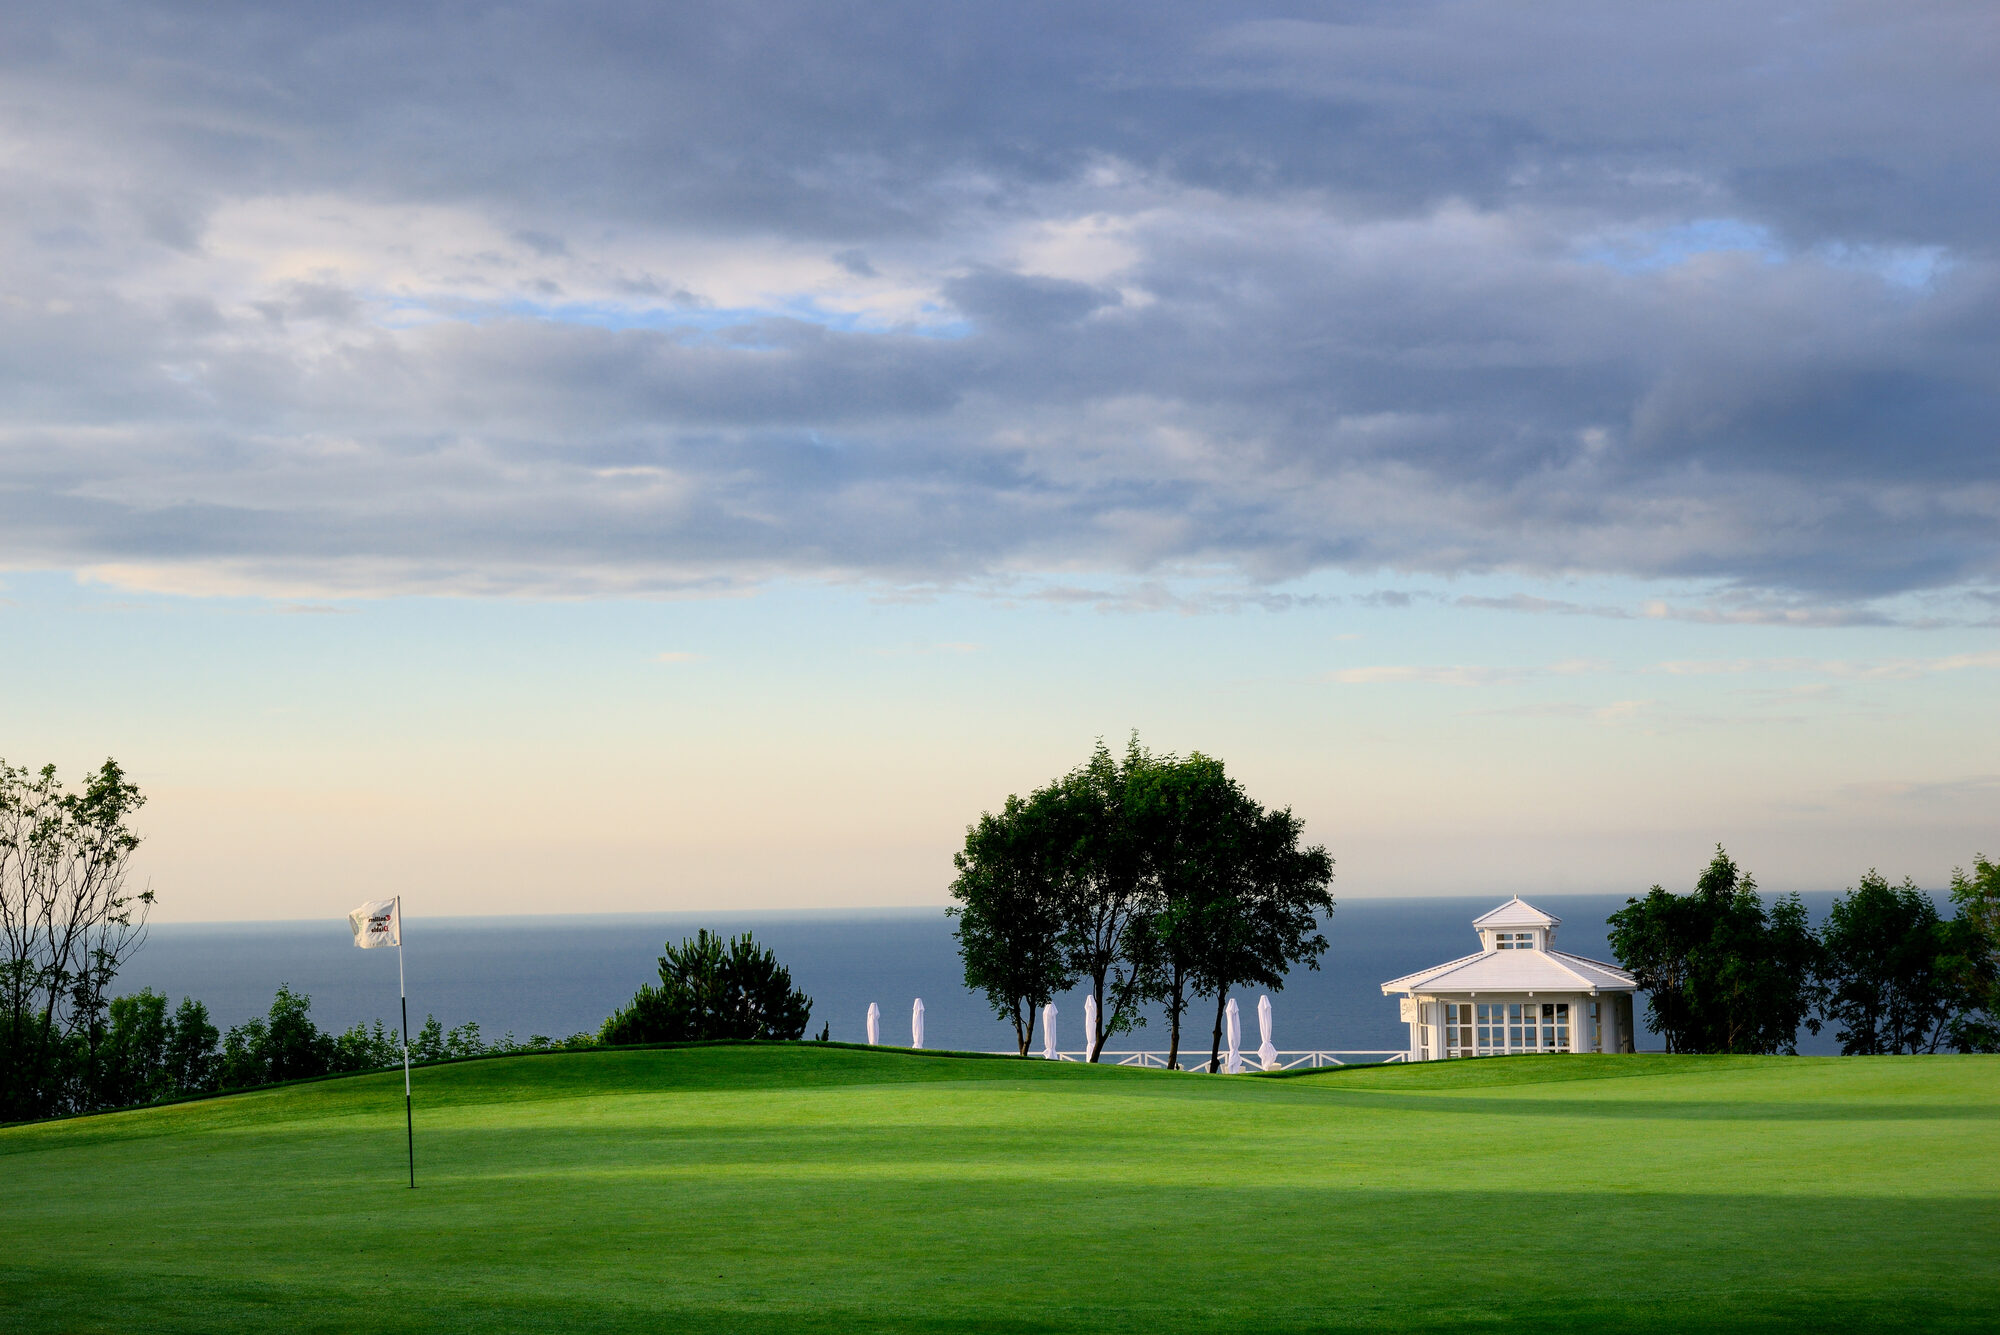
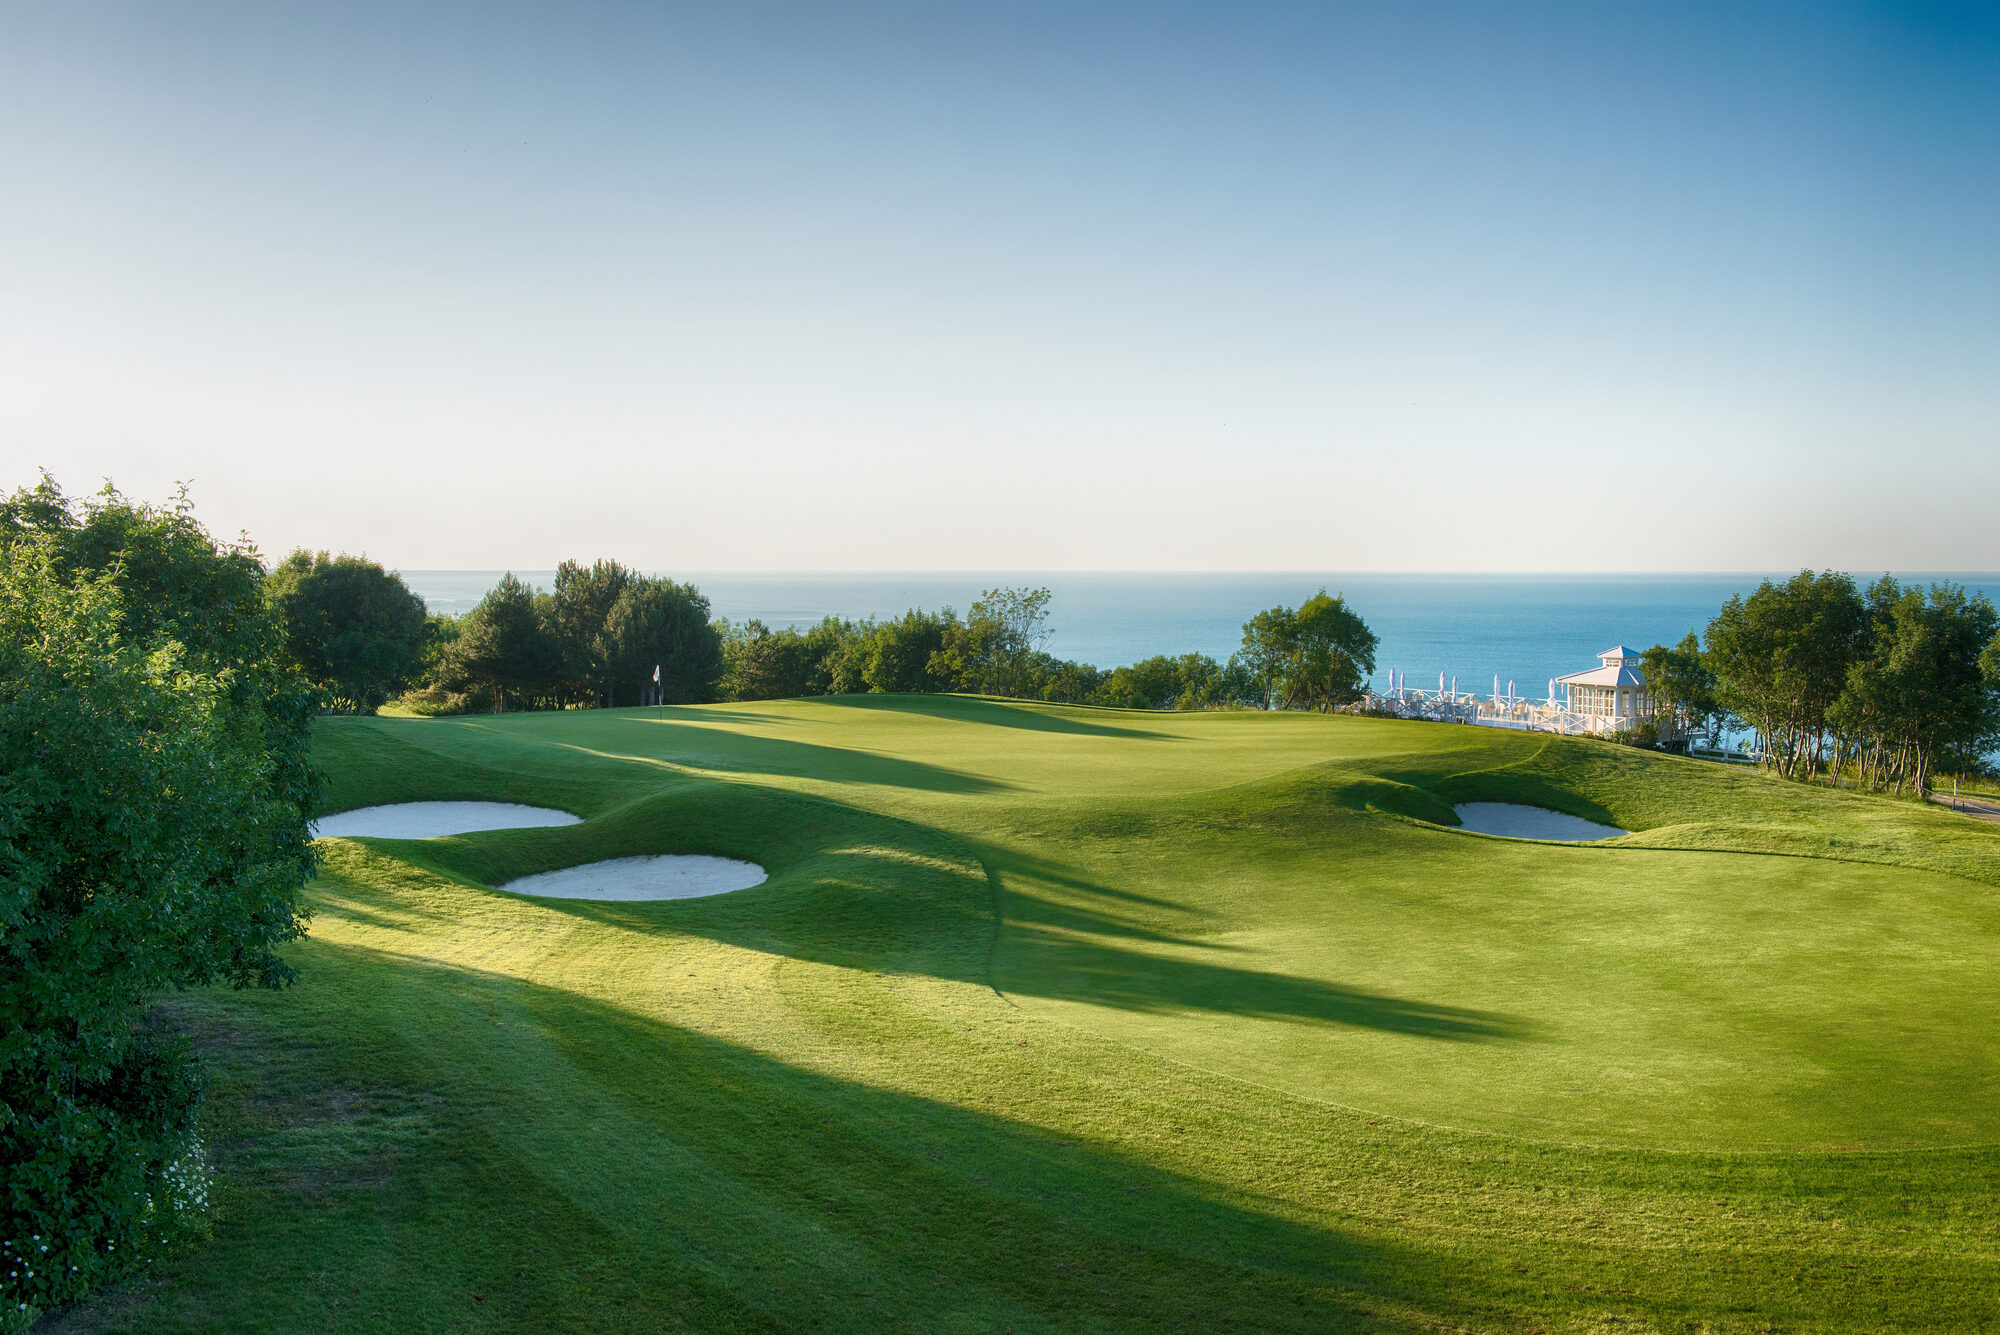
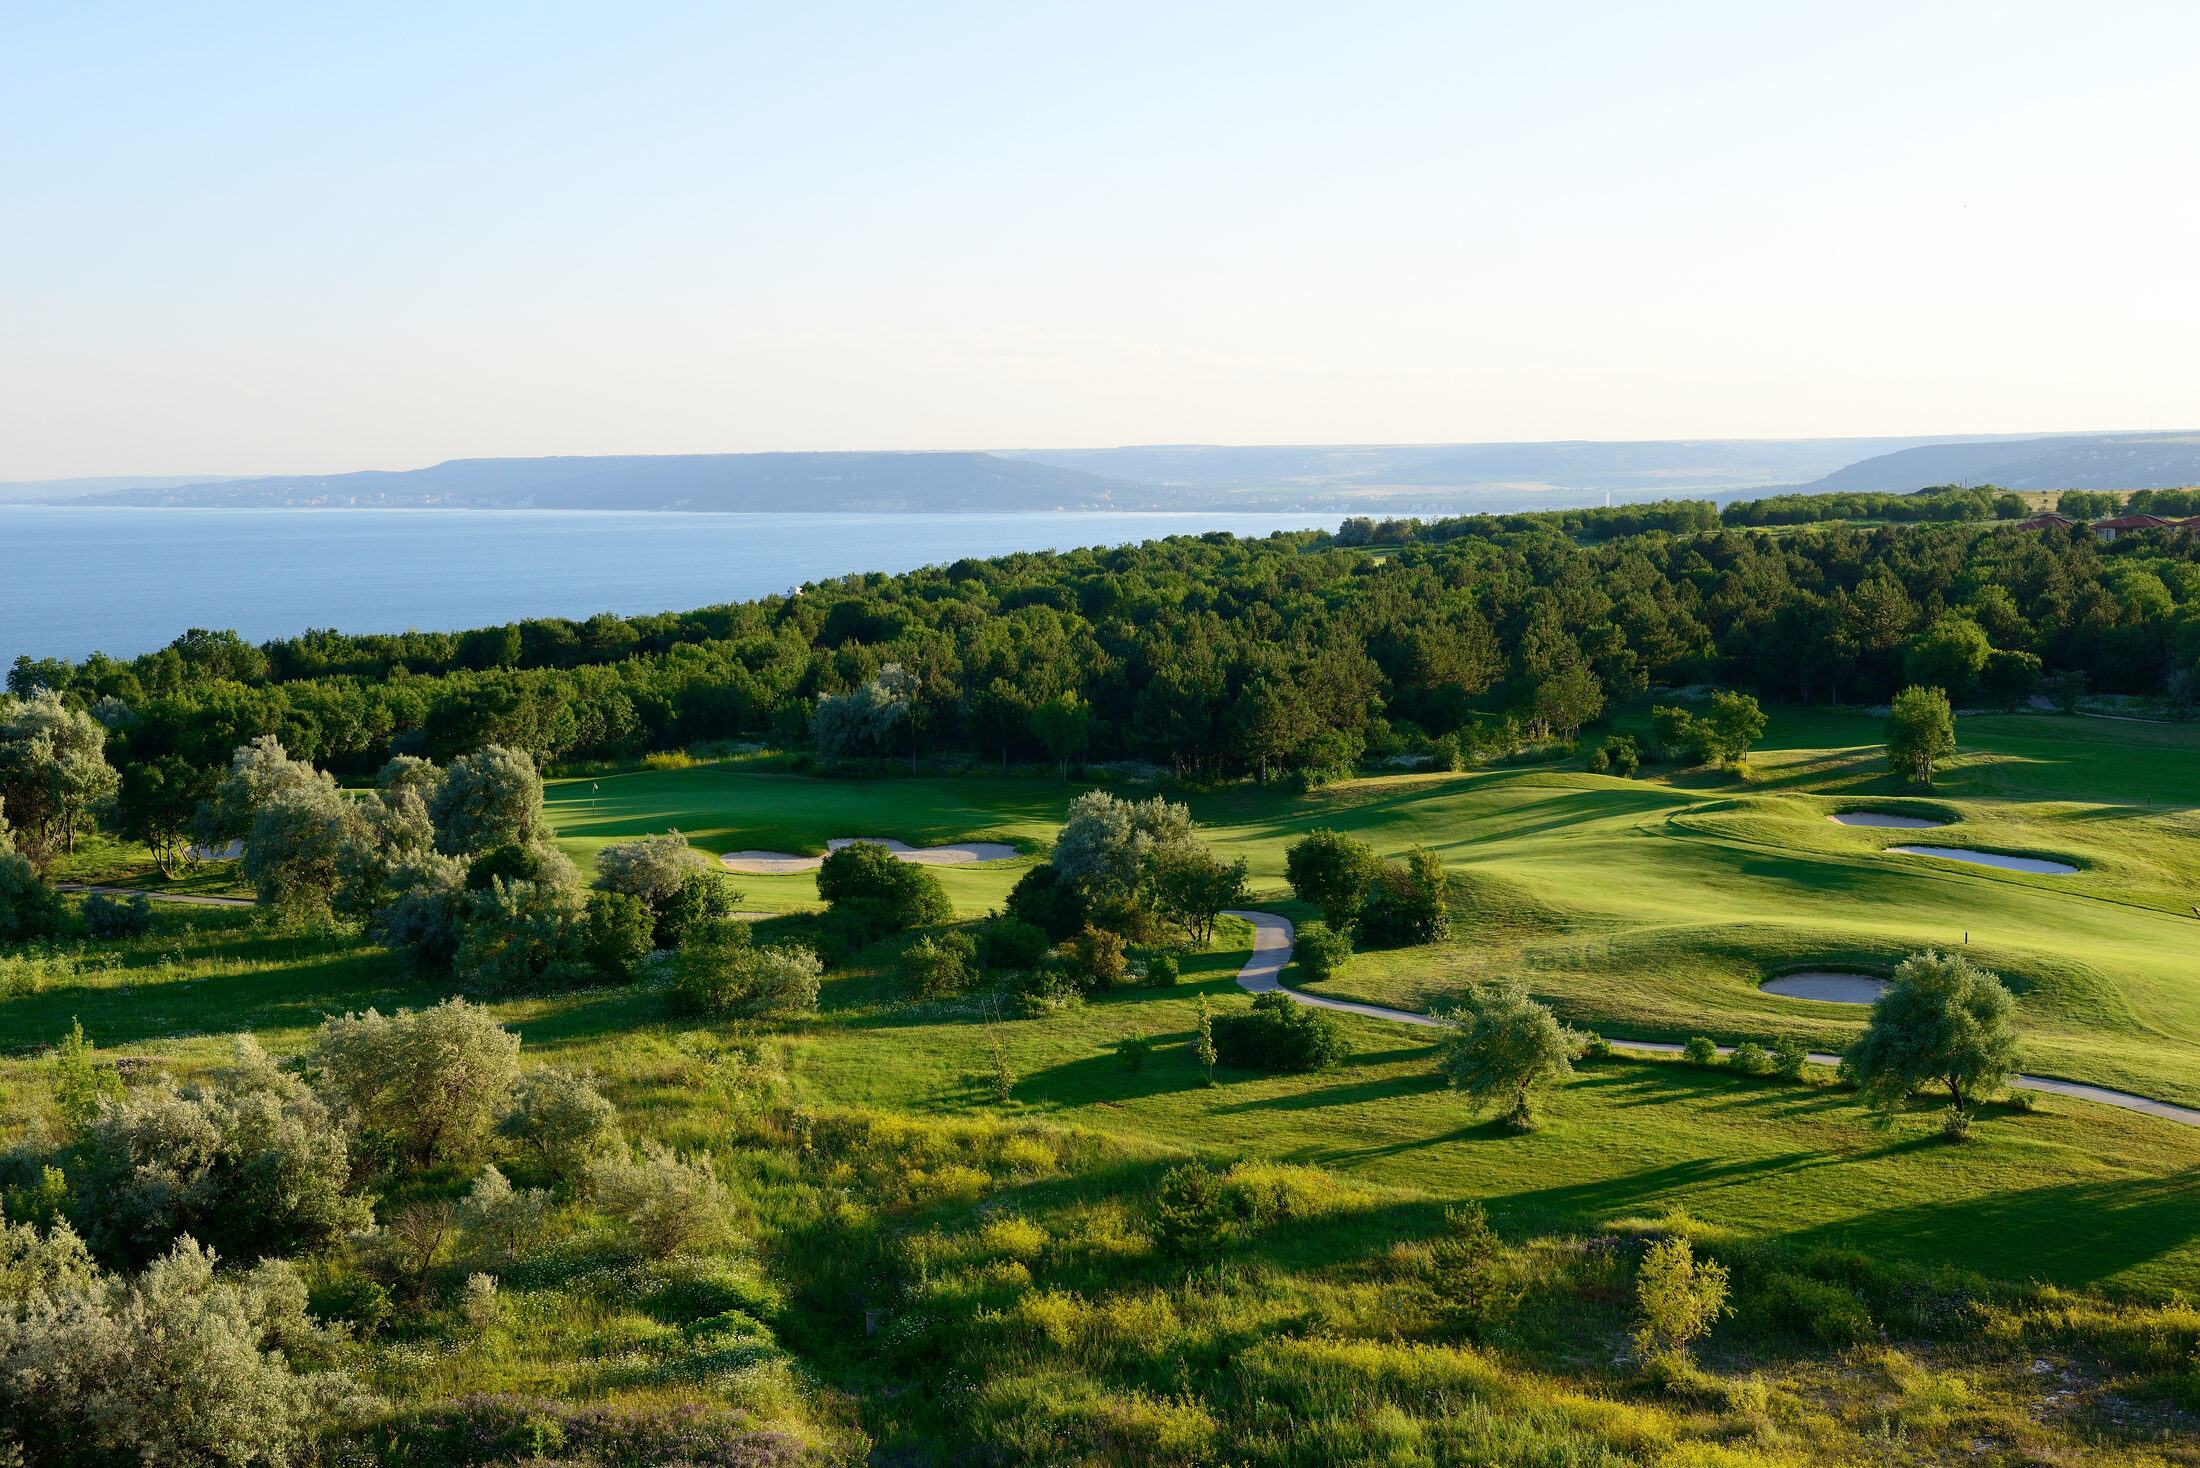
Since 2016, Lighthouse Golf Course has been one of Bulgaria’s premier golfing destinations and a proud winner multiple times of World Golf Awards. Designed by the renowned Ian Woosnam, former Ryder Cup Captain, this course attracts champions and golf enthusiasts from around the world who come to compete in top-level international tournaments held here. Set against the stunning backdrop of the Black Sea, the course’s 18 holes offer a blend of strategic challenges that appeal to both amateurs and professionals. With breathtaking views and thoughtfully crafted fairways, Lighthouse Golf Course is an ideal spot for golfers seeking a memorable golf holiday in Bulgaria, offering a truly immersive experience along the Cape Kaliakra Signature Golf Coast.

by World Golf Awards
by World Golf Awards

by Top 100 Golf Resorts
Play № 1
in Bulgaria
For golfers looking to combine challenging play with luxurious amenities, Lighthouse Golf Course offers the perfect balance. As the only golf course of this scale in Bulgaria, it provides an experience where a top-notch golf facility meets the sophistication of a 5-star resort. At Lighthouse Golf & Spa Resort, golfers enjoy more than just the game. The resort combines a world-class course, relaxing spa, and elegant accommodations, making it an ideal choice for a golf and wellness getaway on Bulgaria’s Black Sea Coast. Whether you’re a seasoned player or new to the sport, the course’s coastal views and thoughtfully designed layout make every round an enjoyable and rewarding experience.
Easy way to start playing the course. It is good to drive down left of the right-side fairway bunker and be ready for the second shot, by which you can aim to hit the green and be exposed to go in…
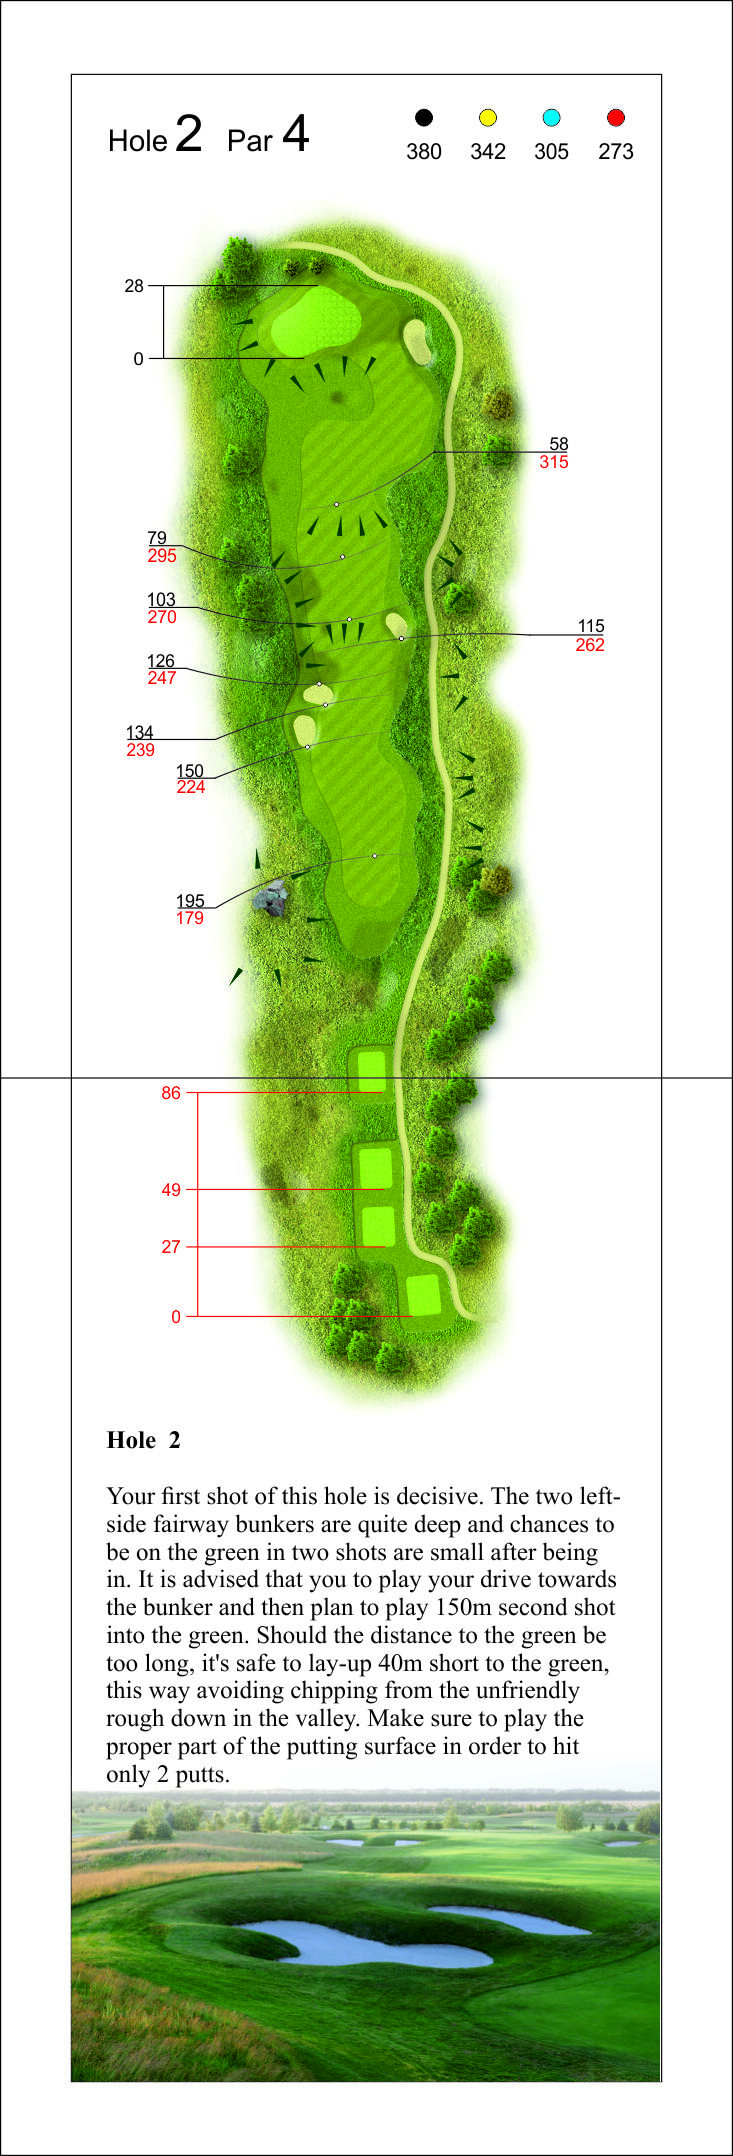
Your first shot of this hole is decisive. The two left side fairway bunkers are quite deep and chances to be on the green in two shots are small after being in. It is advised that you play your drive…
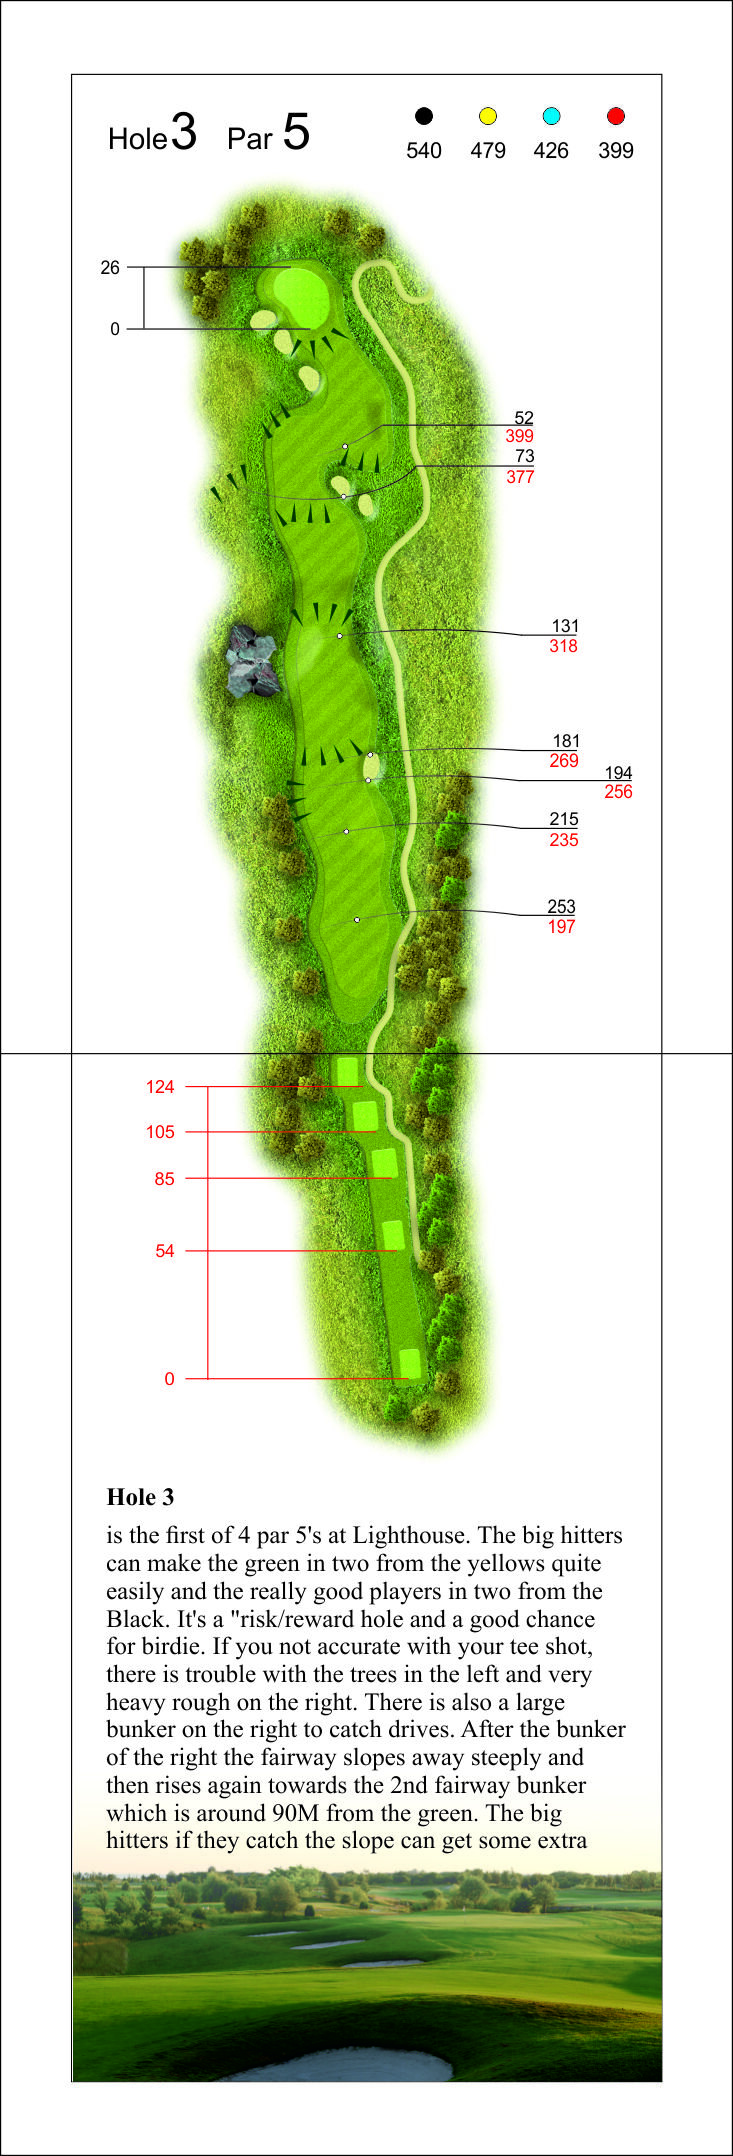
It is the first of 4 par 5s at the Lighthouse. The big hitters can make the green in two from the yellows quite easily and the really good players in two from the Black. It is a “risk/reward”…
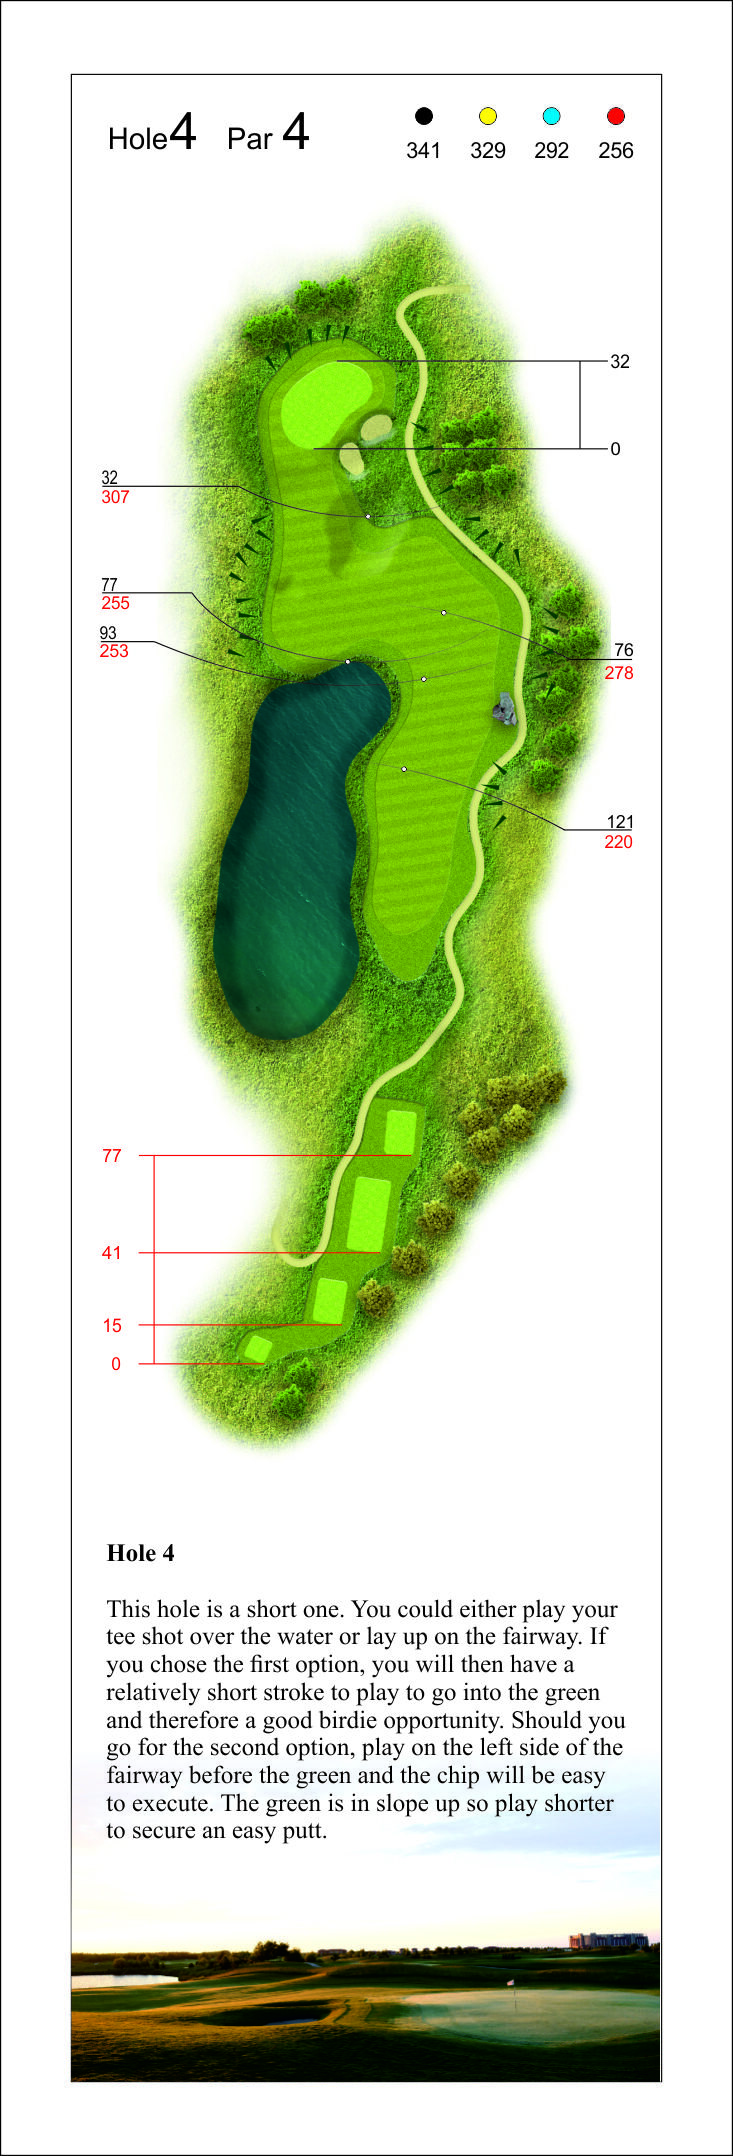
This hole is a shot one. You could either play your tee shot over the water or lay up on the fairway. If you choose the first option, you will then have a relatively short stroke to play to go into…
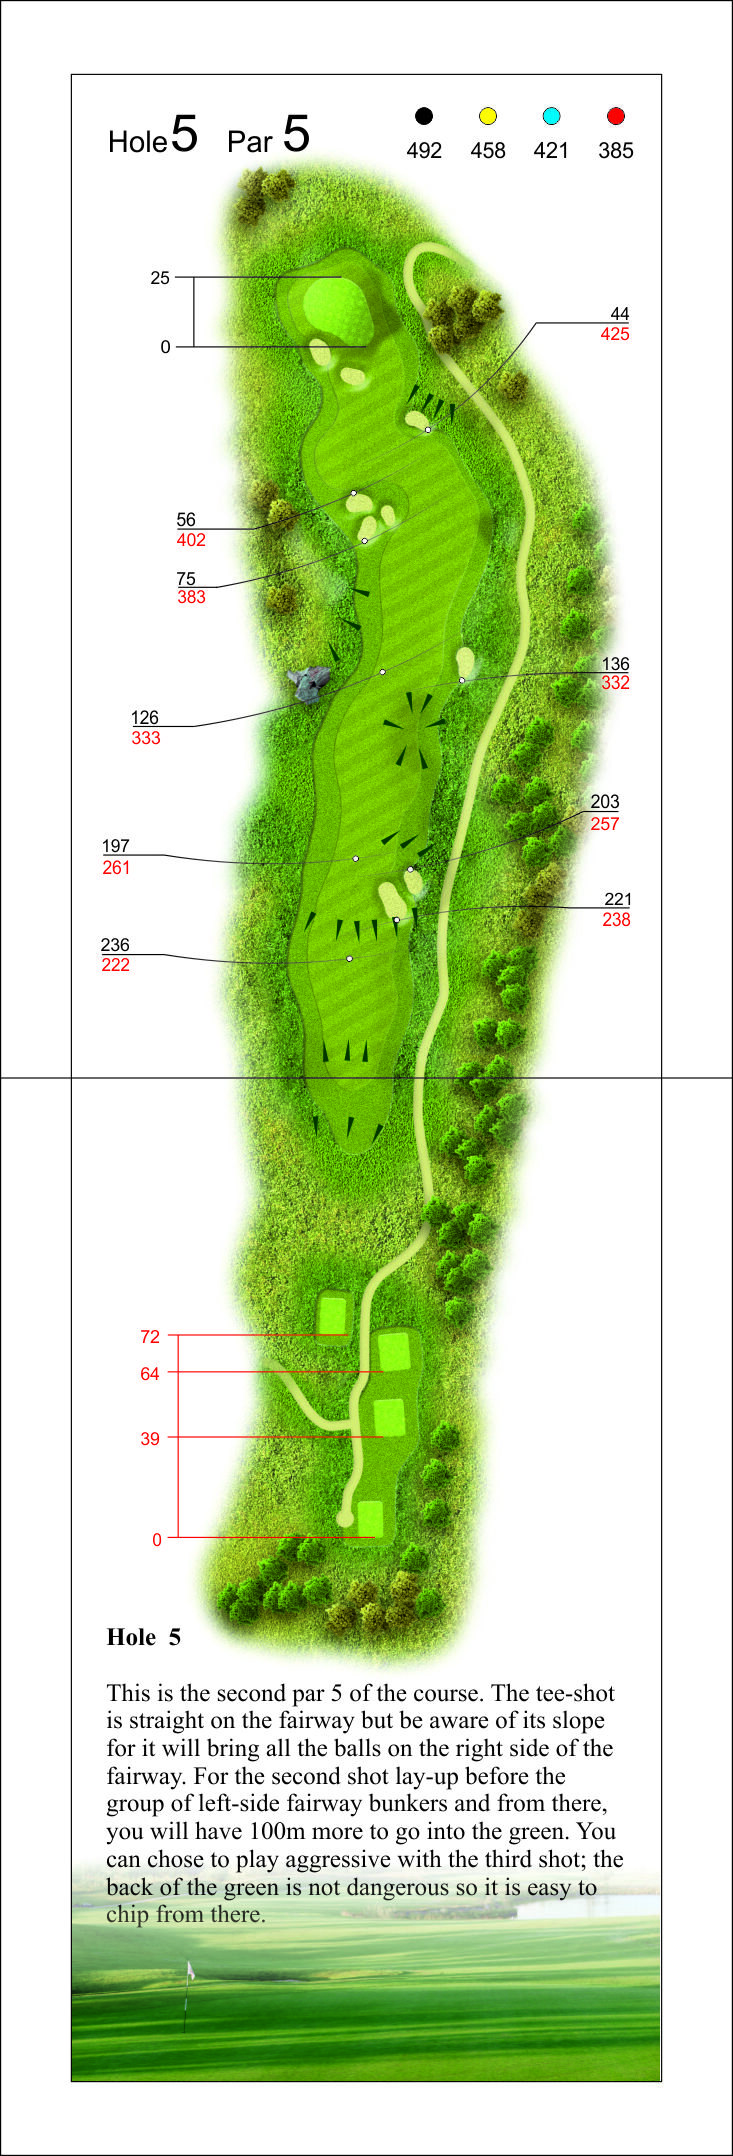
This is the second par 5 of the course. The tee-shot is straight on the fairway, but be aware of its slope for it will all the balls on the right side of the fairway. For the second shot lay-up…
A short par 3, but with deceptive wind coming off the sea. The green is protected by bunkers on the left, so take one more club and aim for the middle of it.
From the back tees, this hole is very technical. You should avoid laying-up your ball between 40m to 70m to the flag. You can lay up before the bunker to go on the green with a full shot or try to go…
The shortest hole on the course, but also one of the trickiest. Accuracy from the tee is everything – a short shot leaves a difficult chip up the slope.
Hole no 9 is the most difficult one to play on this course. If you are a long hitter, play little to the right. The entire rough on the right side will be easy to play. If your shots are not that…
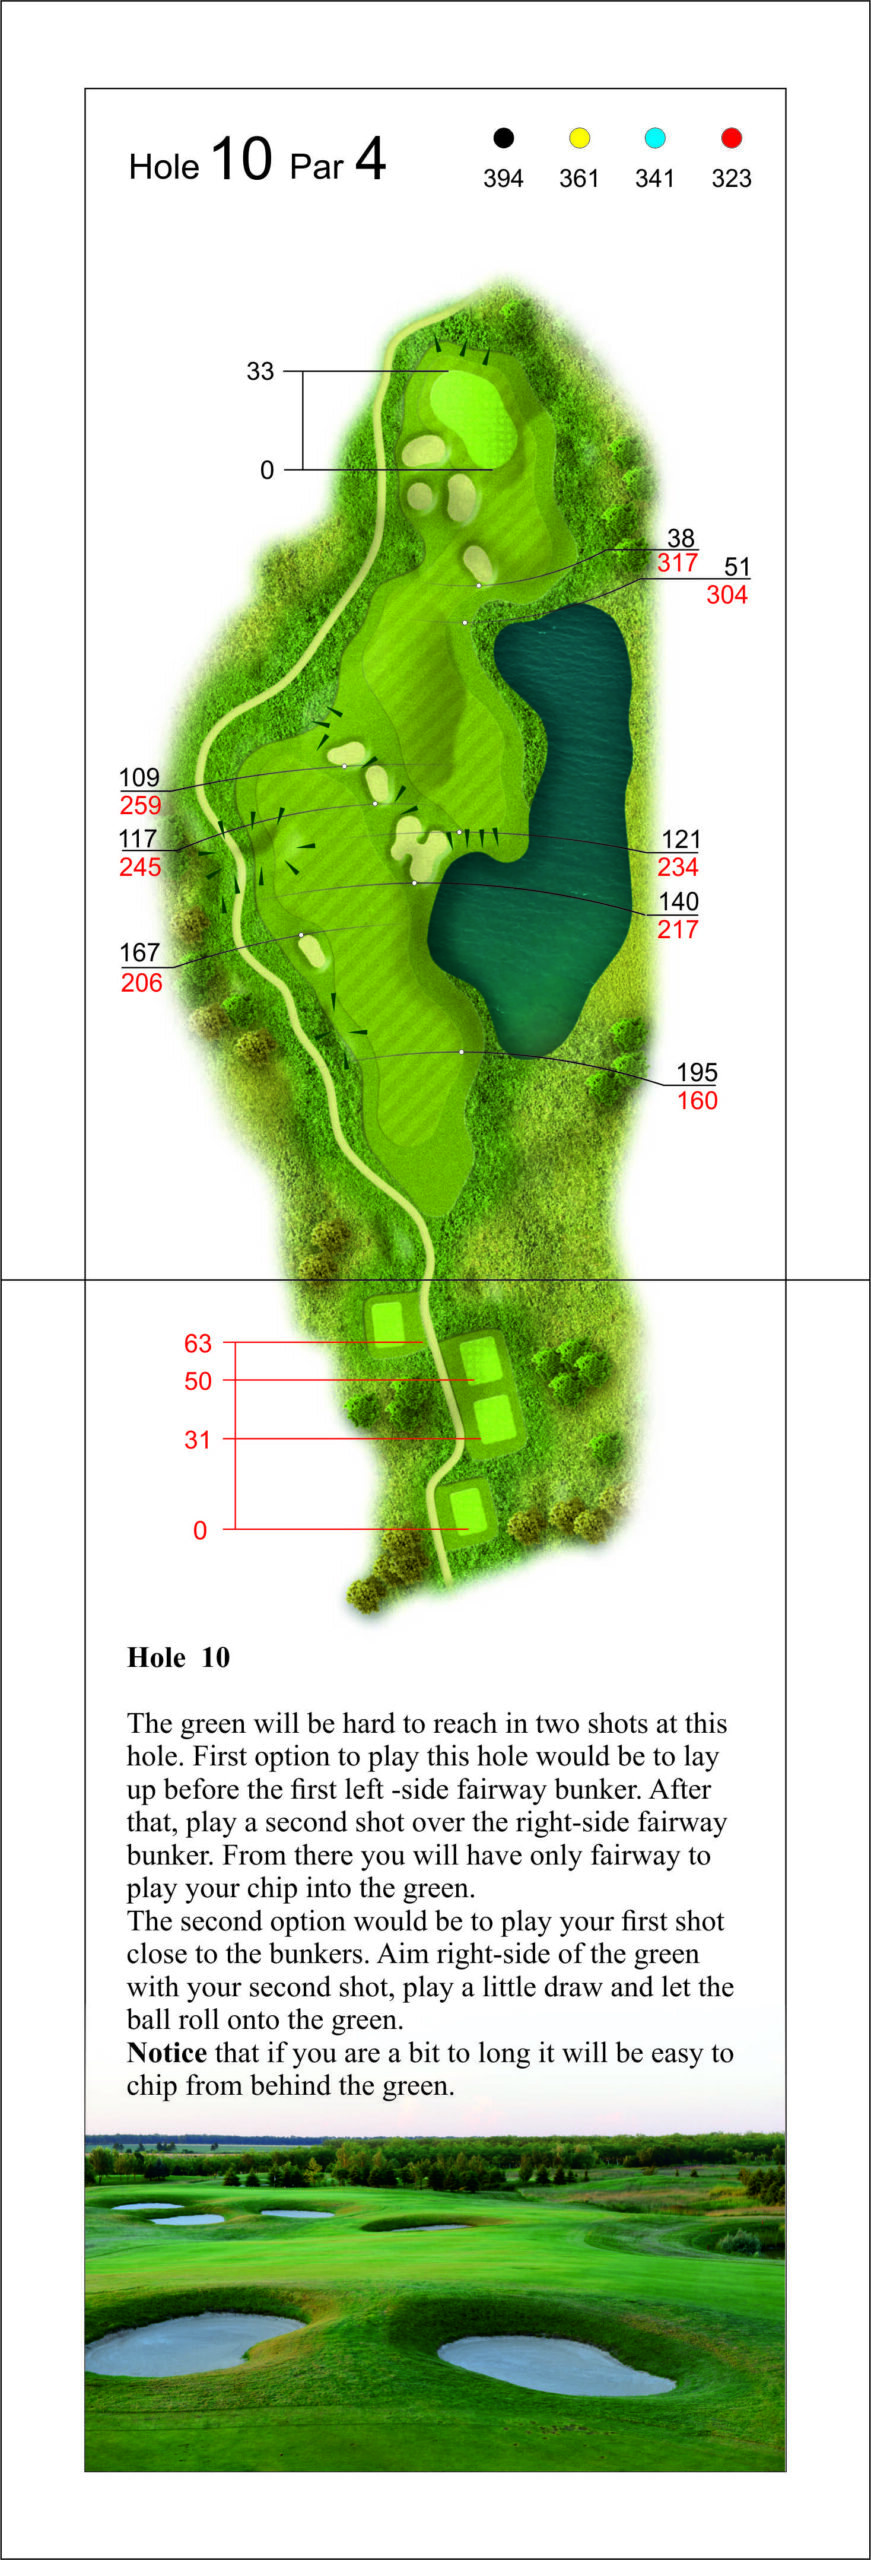
The green will be hard to reach in two shots at this hole. First option to play this hole would be to lay up before the first left-side fairway bunker. After that, play a second shot over the…
A long par 3 with an elevated green. Take enough club, as the front is guarded by a deep bunker and the back drops away steeply.
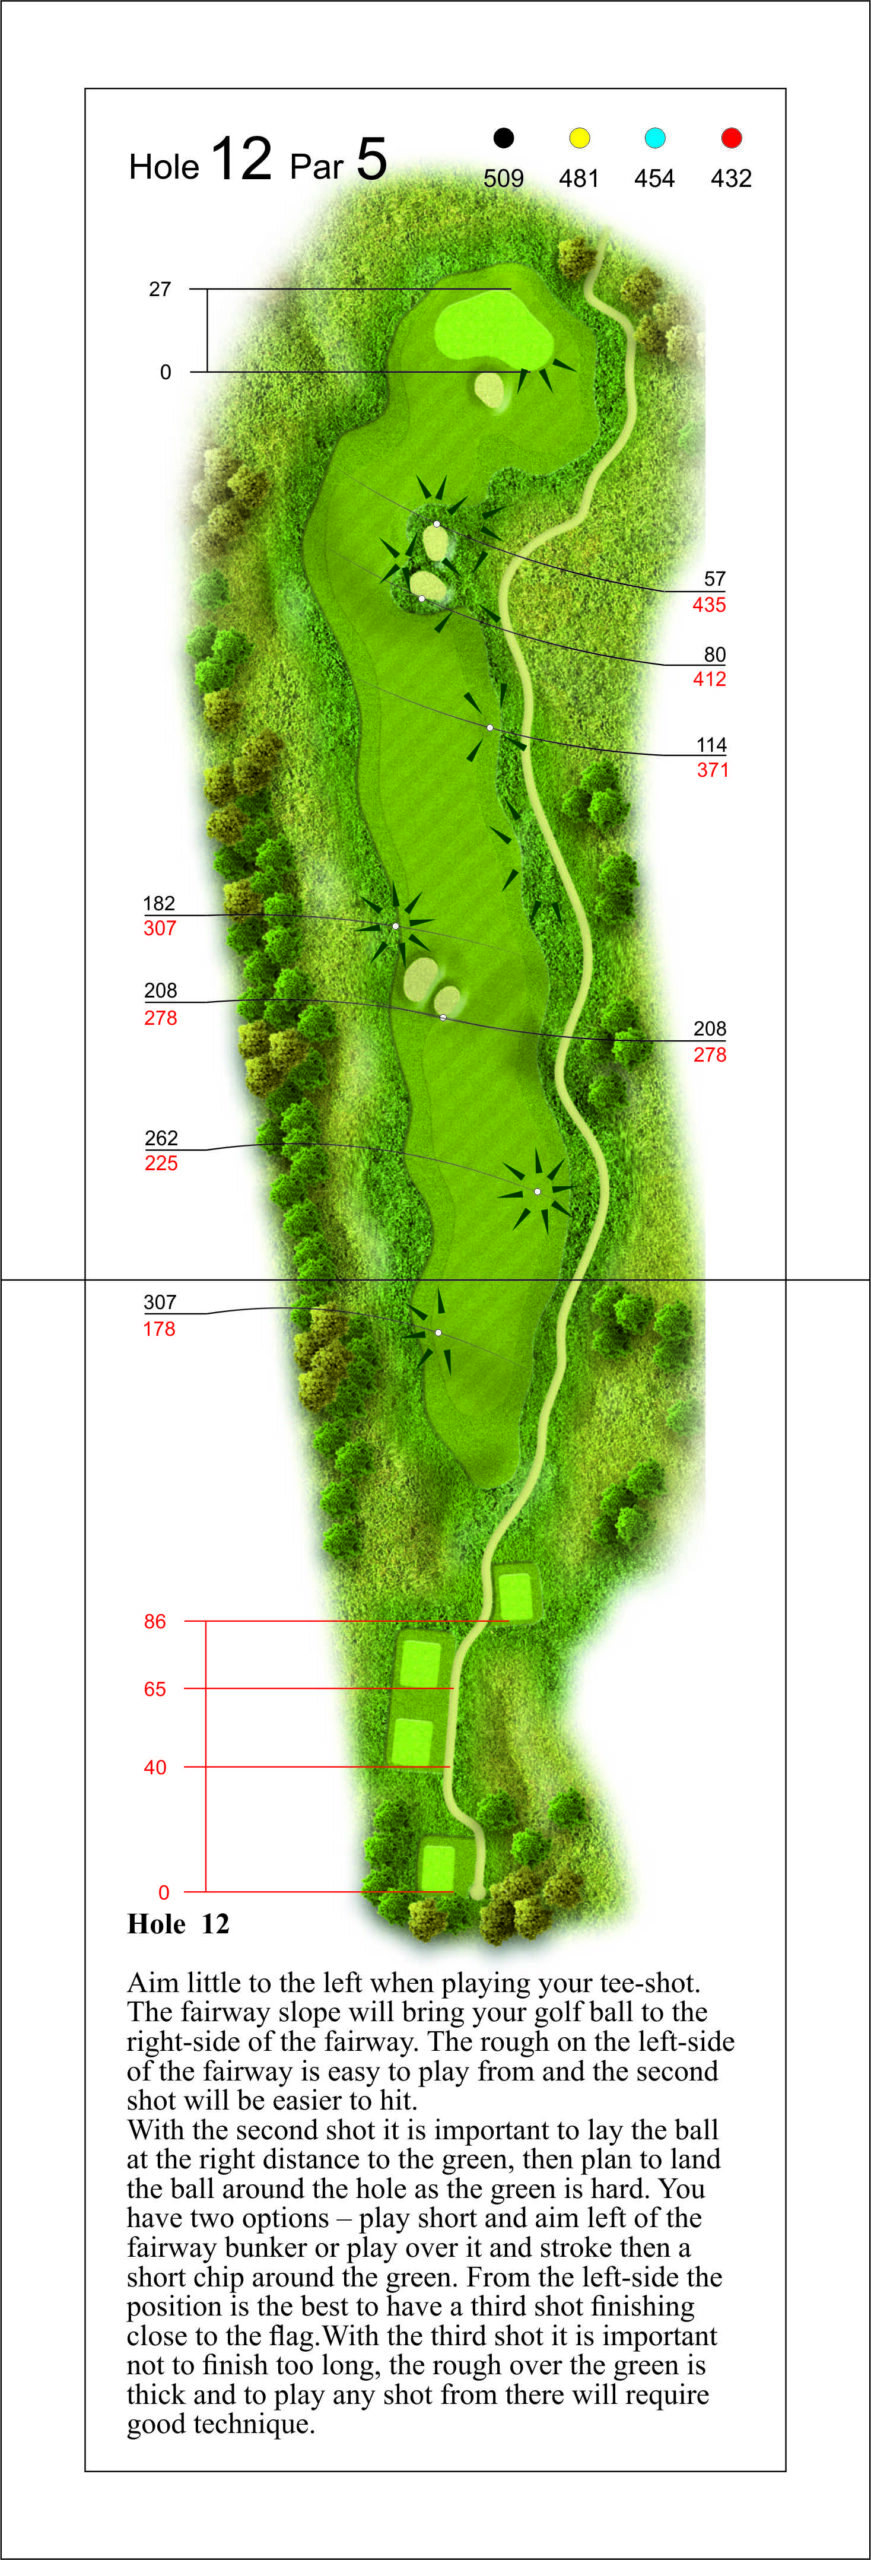
Aim little to the left when playing your tee-shot. The fairway slope will bring your golf ball to the right-side of the fairway. The rough on the left-side of the fairway is easy to play from and the…
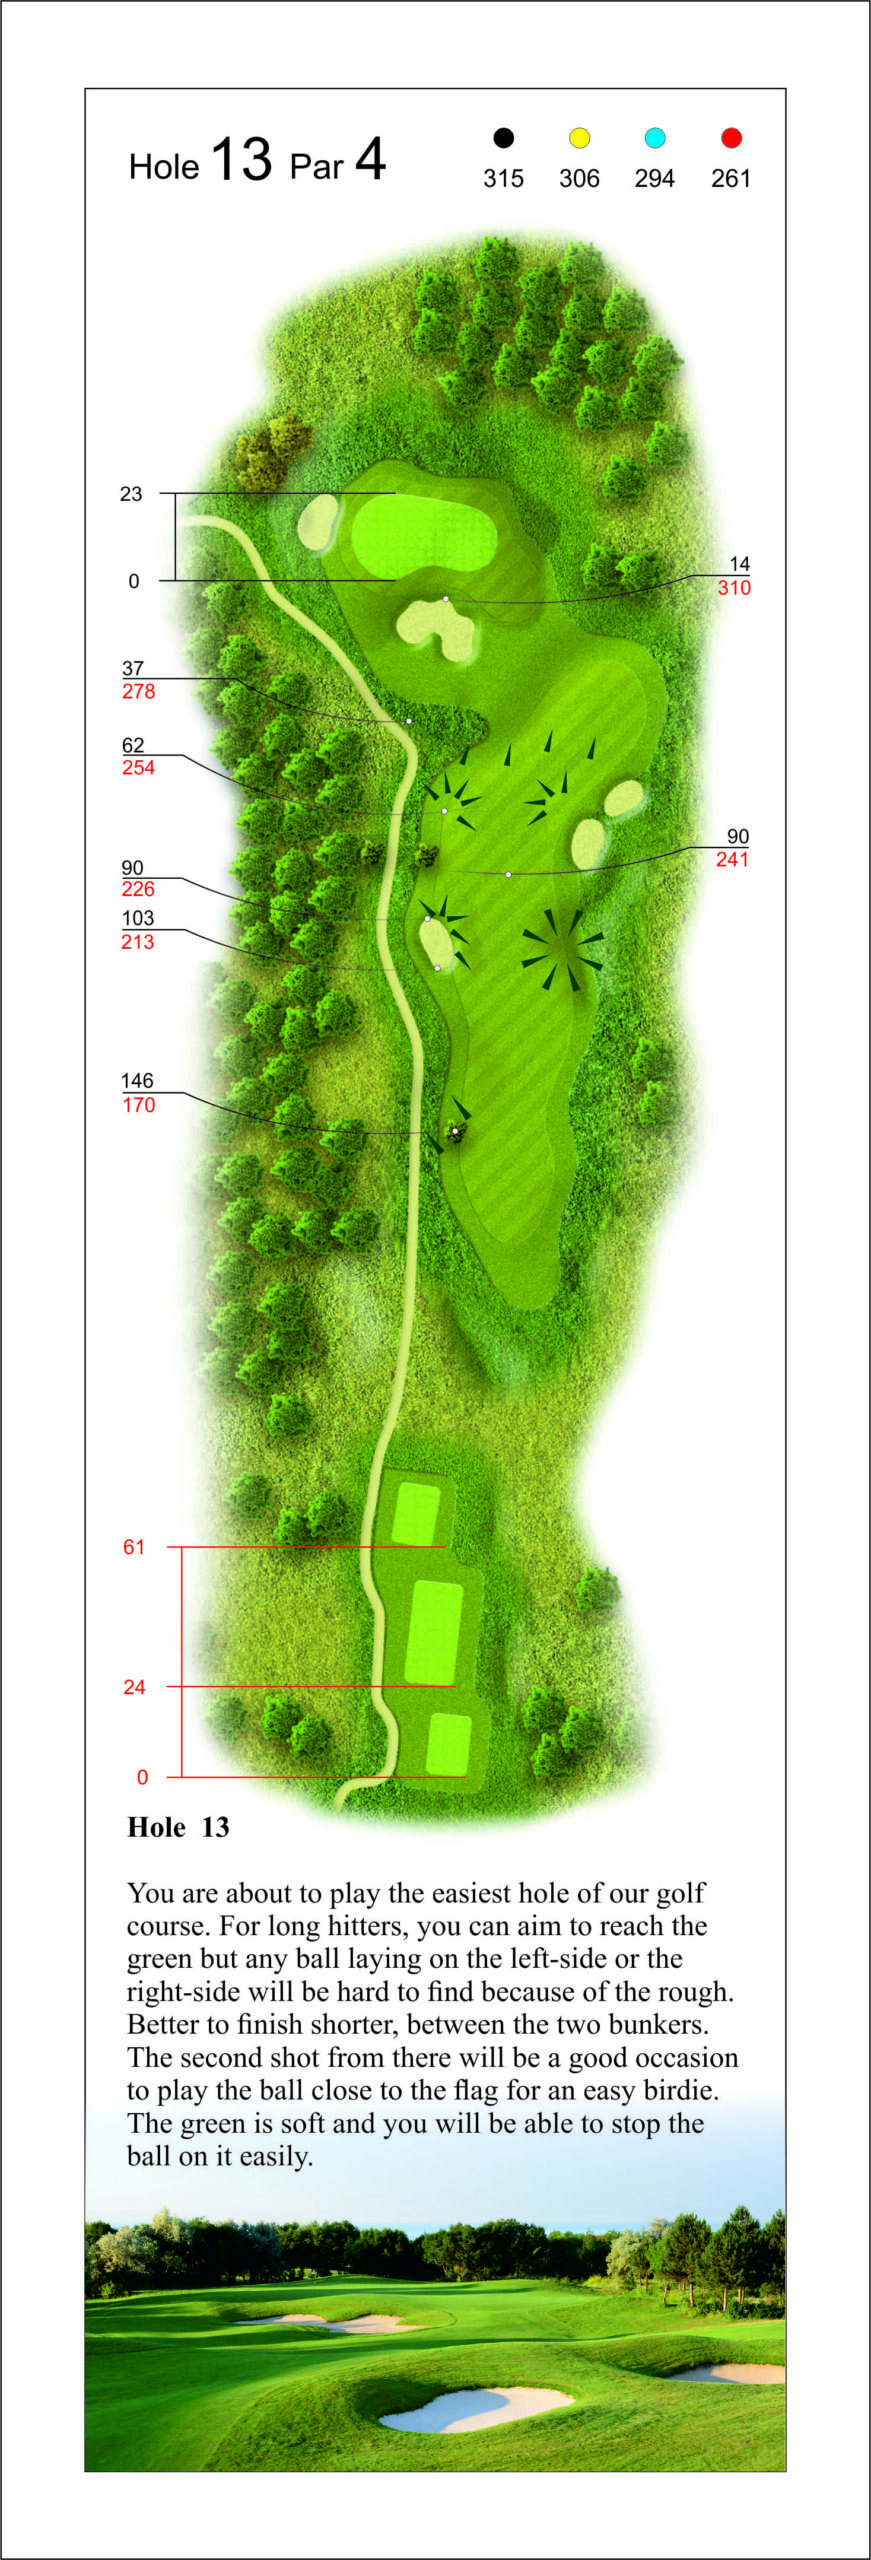
You are about to play the easiest hole of our golf course. For long hitters, you can aim to reach the green but any ball laying on the left-side or the right-side will be hard to find because of the…
The tee shot is played entirely over the hollow, with the sea in the background. Aim for the left half of the green and let the ball work to the right.
The tee shot looks impressive and narrow, but any ball pitching on the side will have lots of chances to bounce on the fairway. Longer players, be aware of the out of bounds on the right-hand side,…
Last Par 5 of the day and a good occasion to score a birdie. For the tee-shot, you can choose to play to the left-side of the fairway bunker, but make sure to not hit too long and finish up rolling in…
The last par 3 of the day. The green is wide but shallow – judge the distance carefully and choose your club according to the wind.
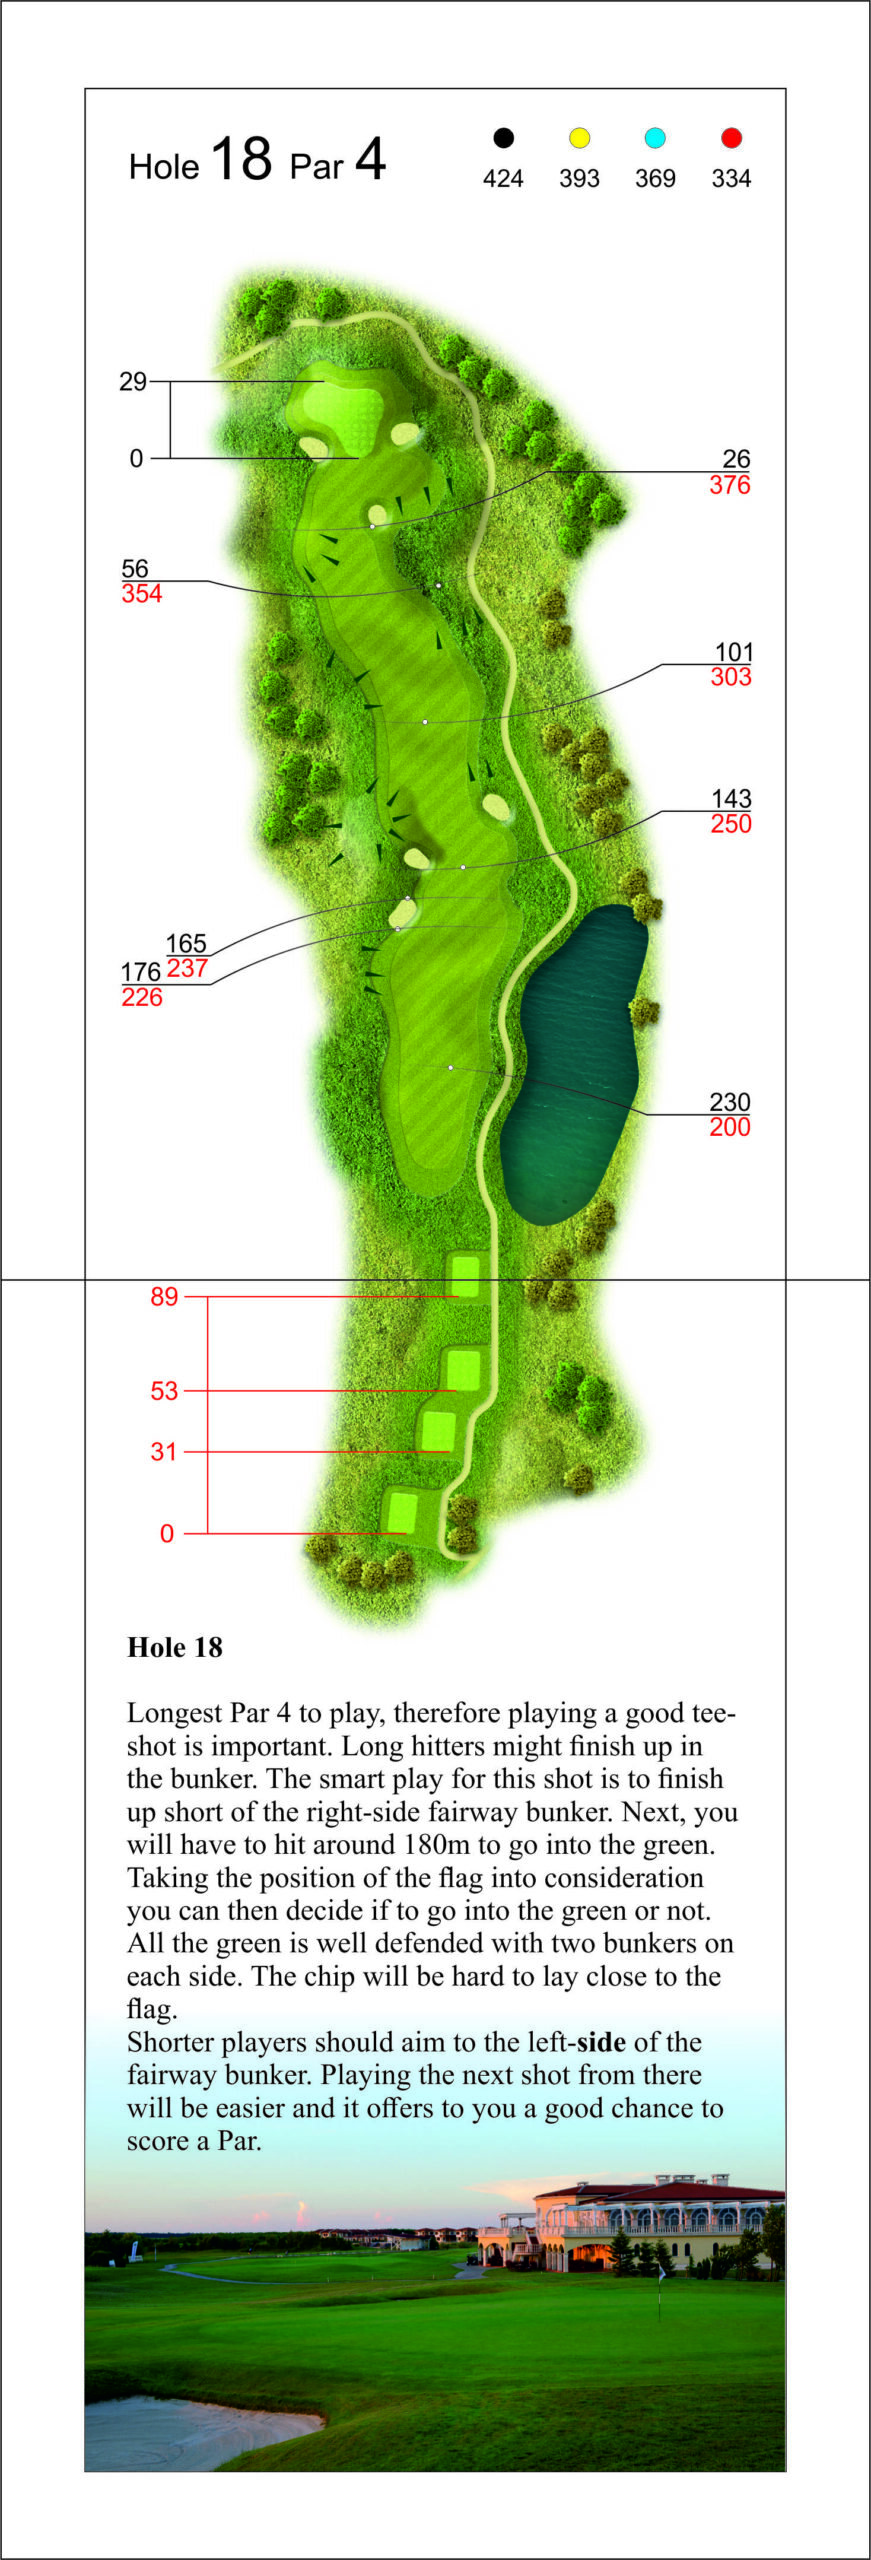
Longest Par 4 to play, therefore playing a good tee-shot is important. Long hitters might finish up in the bunker. The smart way to play for this shot is to finish up short of the right-side fairway…
PAR 4 – 364 M
| Color | Par | Meters | Stroke Index |
|---|---|---|---|
| Black | 4 | 364 | 5 |
| Yellow | 4 | 338 | 5 |
| Blue | 4 | 320 | 5 |
| Red | 4 | 289 | 5 |
Easy way to start playing the course. It is good to drive down left of the right-side fairway bunker and be ready for the second shot, by which you can aim to hit the green and be exposed to go in the deep left-side green bunker, or just lay-up short of the green and play an easy chip from there on the large flat green.
PAR 4 – 380 M
| Color | Par | Meters | Stroke Index |
|---|---|---|---|
| Black | 4 | 380 | 7 |
| Yellow | 4 | 342 | 7 |
| Blue | 4 | 305 | 7 |
| Red | 4 | 273 | 7 |
Your first shot of this hole is decisive. The two left side fairway bunkers are quite deep and chances to be on the green in two shots are small after being in. It is advised that you play your drive towards the bunker and then plan to play 150m second shot into the green. Should the distance to the green be too long, it is safe to lay-up 40m short to the green, this way avoiding chipping from the unfriendly rough down in the valley. Make sure to play the proper part of the putting surface in order to hit only 2 putts.
PAR 5 – 479 M
| Color | Par | Meters | Stroke Index |
|---|---|---|---|
| Black | 5 | 479 | 13 |
| Yellow | 5 | 452 | 13 |
| Blue | 5 | 426 | 13 |
| Red | 5 | 399 | 13 |
It is the first of 4 par 5s at the Lighthouse. The big hitters can make the green in two from the yellows quite easily and the really good players in two from the Black. It is a “risk/reward” hole and a good chance for a birdie. If not accurate with your tee shot, there is trouble with the trees in the left and very heavy rough on the right. There is also a large bunker to catch divers. After the bunker on the right the fairway slopes away steeply and then rises again towards the 2nd fairway bunker which is around 90m from the green. The big hitters if they catch the slope can get some extra distance with the natural run of the fairway. For the mid to high handicappers, there is trouble lurking on the left with a large rocky planted area around 100m from the green. Your 2nd and 3rd shot to the green needs to be accurate, as there are 2 large sloping bunkers 15m from the green on the left side and a steep sloping back on the right where a bad bounce will take you down the slope. The Green is elevated and relatively flat with some undulations here and there. Good accuracy from the tee and a birdie chance or solid par is possible.
PAR 4 – 329 M
| Color | Par | Meters | Stroke Index |
|---|---|---|---|
| Black | 4 | 329 | 9 |
| Yellow | 4 | 321 | 9 |
| Blue | 4 | 292 | 9 |
| Red | 4 | 256 | 9 |
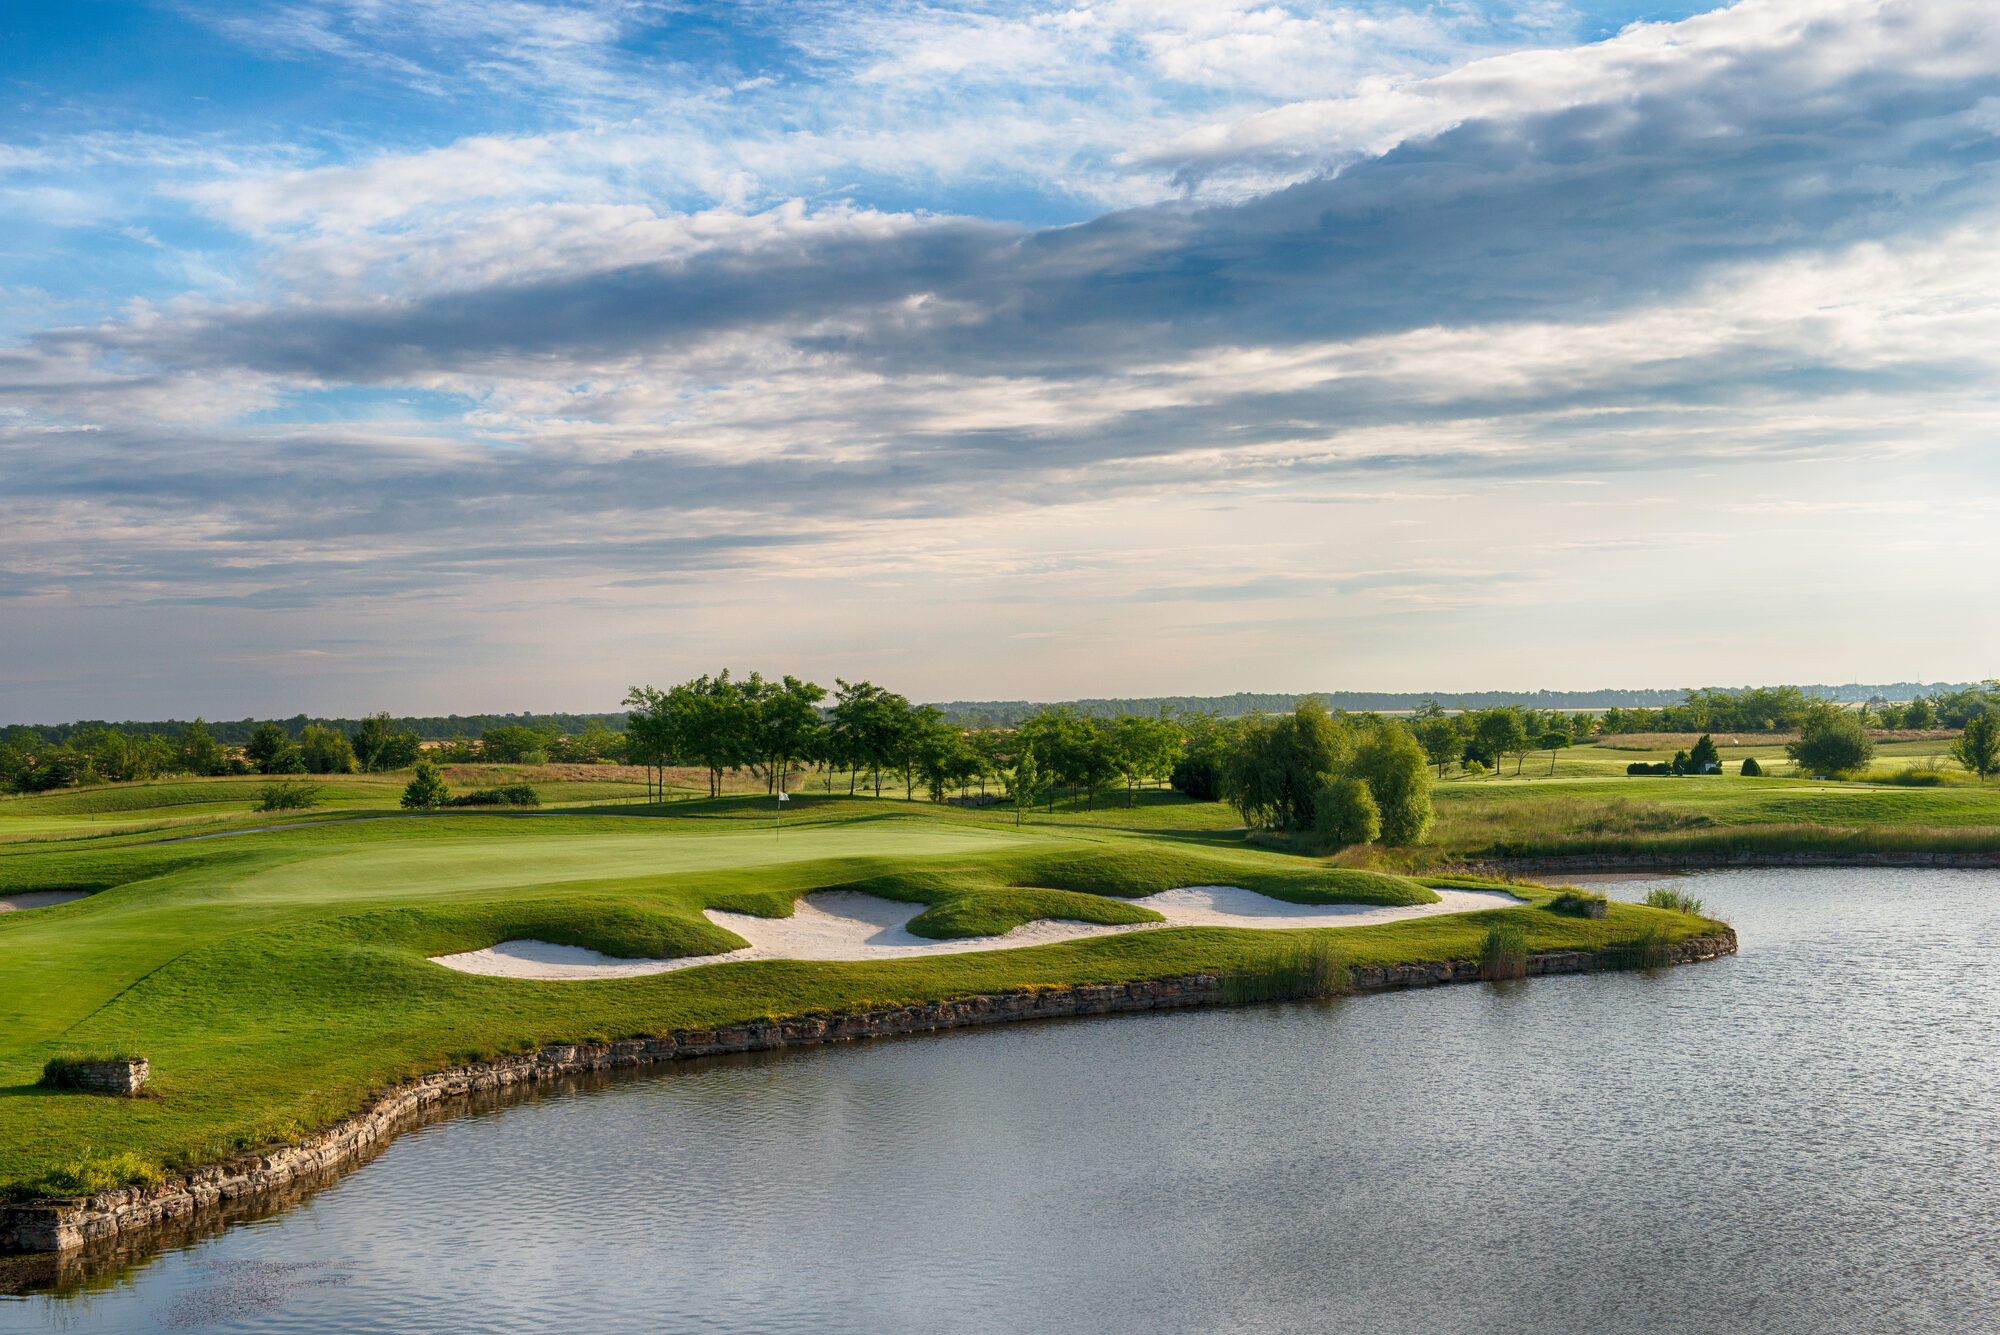
This hole is a shot one. You could either play your tee shot over the water or lay up on the fairway. If you choose the first option, you will then have a relatively short stroke to play to go into the green and therefore a good birdie opportunity. Should you go to the second option, play on the left side of the fairway before the green and the chip will be easy to execute. The green is in slope up so play shorter to secure and easy putt.
PAR 5 – 492 M
| Color | Par | Meters | Stroke Index |
|---|---|---|---|
| Black | 5 | 492 | 3 |
| Yellow | 5 | 458 | 3 |
| Blue | 5 | 421 | 3 |
| Red | 5 | 385 | 3 |
This is the second par 5 of the course. The tee-shot is straight on the fairway, but be aware of its slope for it will all the balls on the right side of the fairway. For the second shot lay-up before the group of left-side fairway bunkers and from there, you will have 100m more to go into the green. You can choose to play aggressive with the third shot, the back of the green is not dangerous so it easy to chip from there.
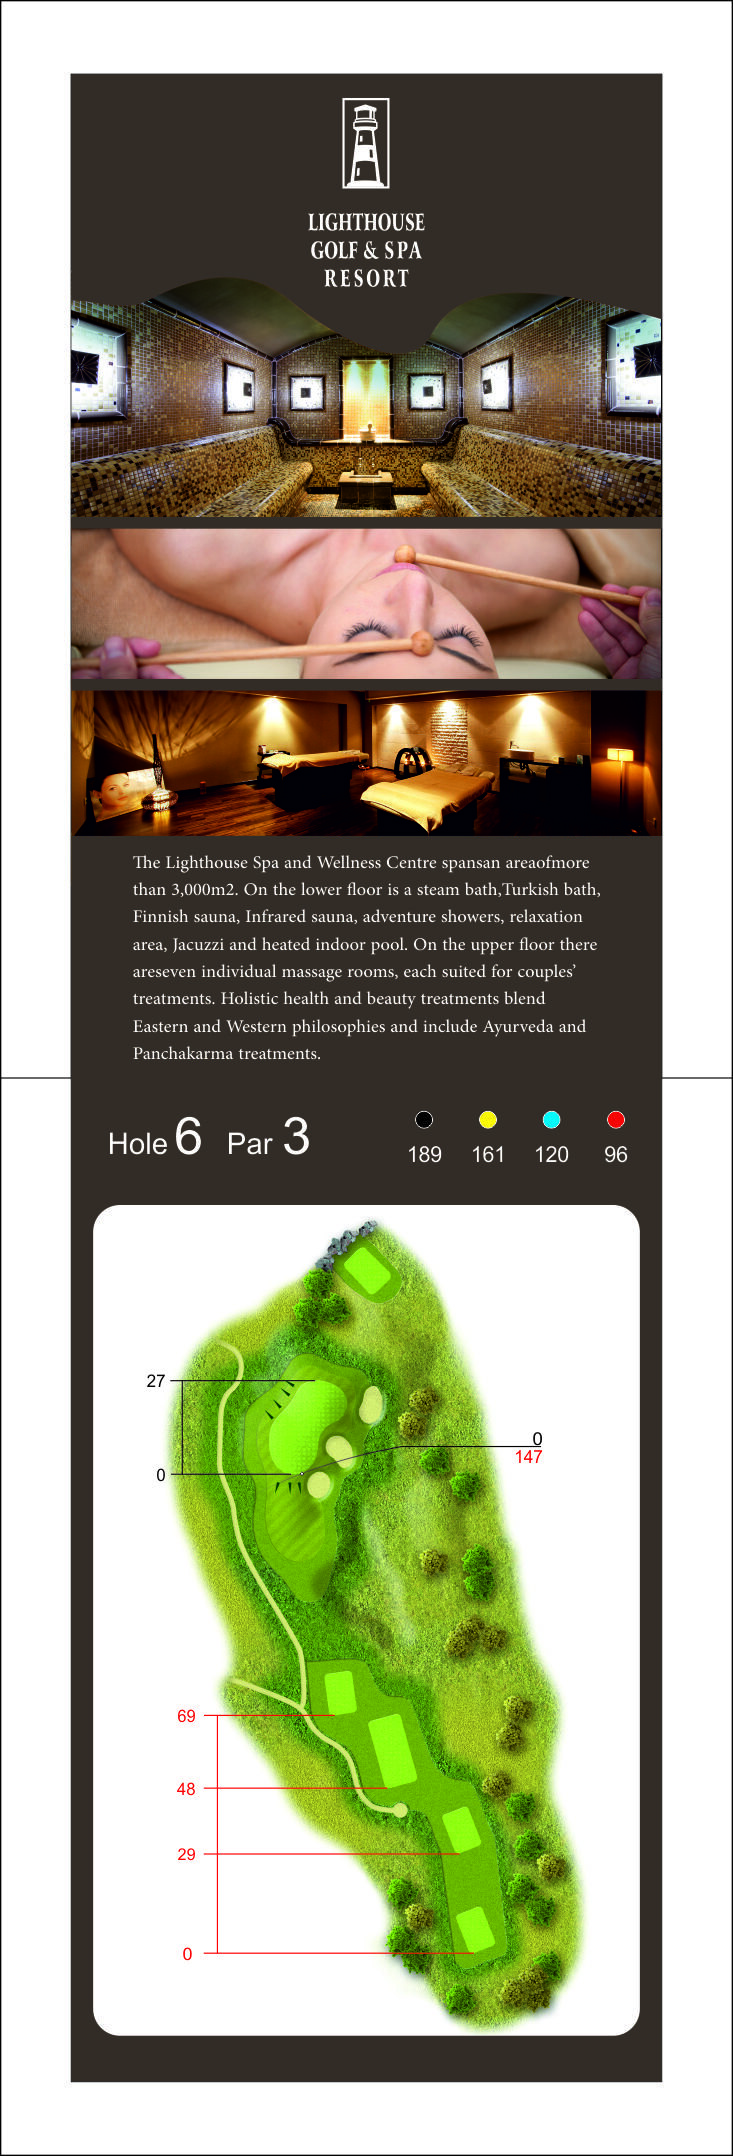
PAR 3 – 161 M
| Color | Par | Meters | Stroke Index |
|---|---|---|---|
| Black | 3 | 161 | 15 |
| Yellow | 3 | 131 | 15 |
| Blue | 3 | 120 | 15 |
| Red | 3 | 96 | 15 |
A short par 3, but with deceptive wind coming off the sea. The green is protected by bunkers on the left, so take one more club and aim for the middle of it.
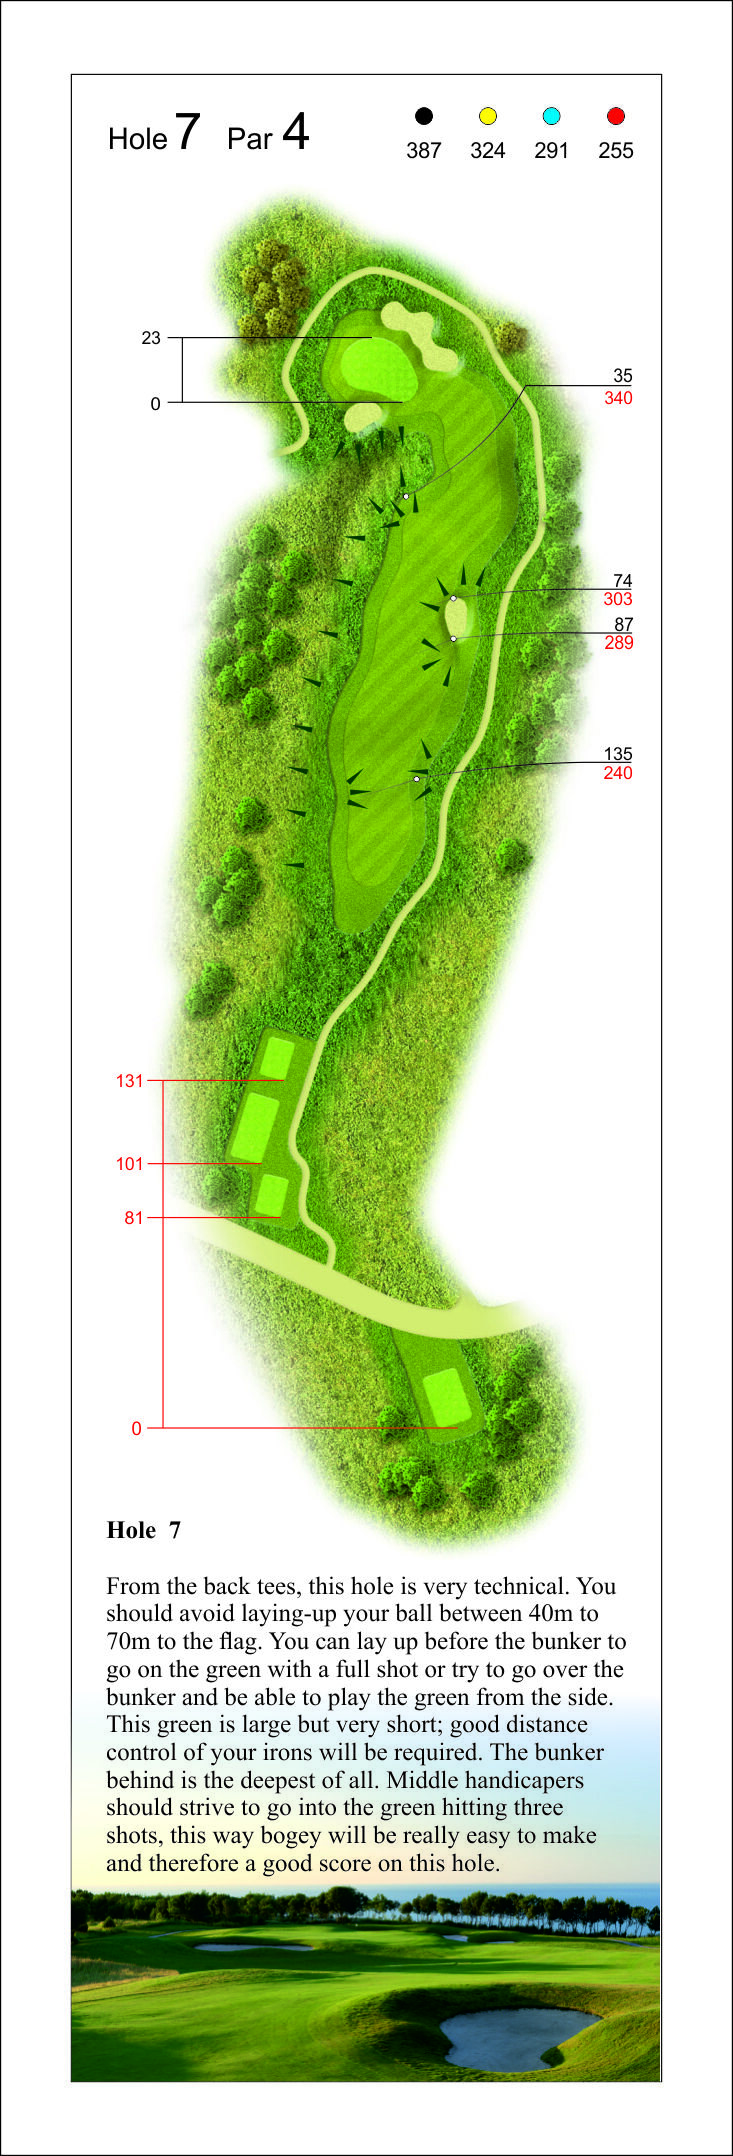
PAR 4 – 324 M
| Color | Par | Meters | Stroke Index |
|---|---|---|---|
| Black | 4 | 324 | 11 |
| Yellow | 4 | 316 | 11 |
| Blue | 4 | 291 | 11 |
| Red | 4 | 255 | 11 |
From the back tees, this hole is very technical. You should avoid laying-up your ball between 40m to 70m to the flag. You can lay up before the bunker to go on the green with a full shot or try to go over the bunker and be able to play the green from the side. The green is large but very short, good distance control of your irons will be required. The bunker behind is the deepest of all. Middle handicappers should strive to go into the green hitting three shots, this way bogey will be really easy to make and therefore a good score on this hole.
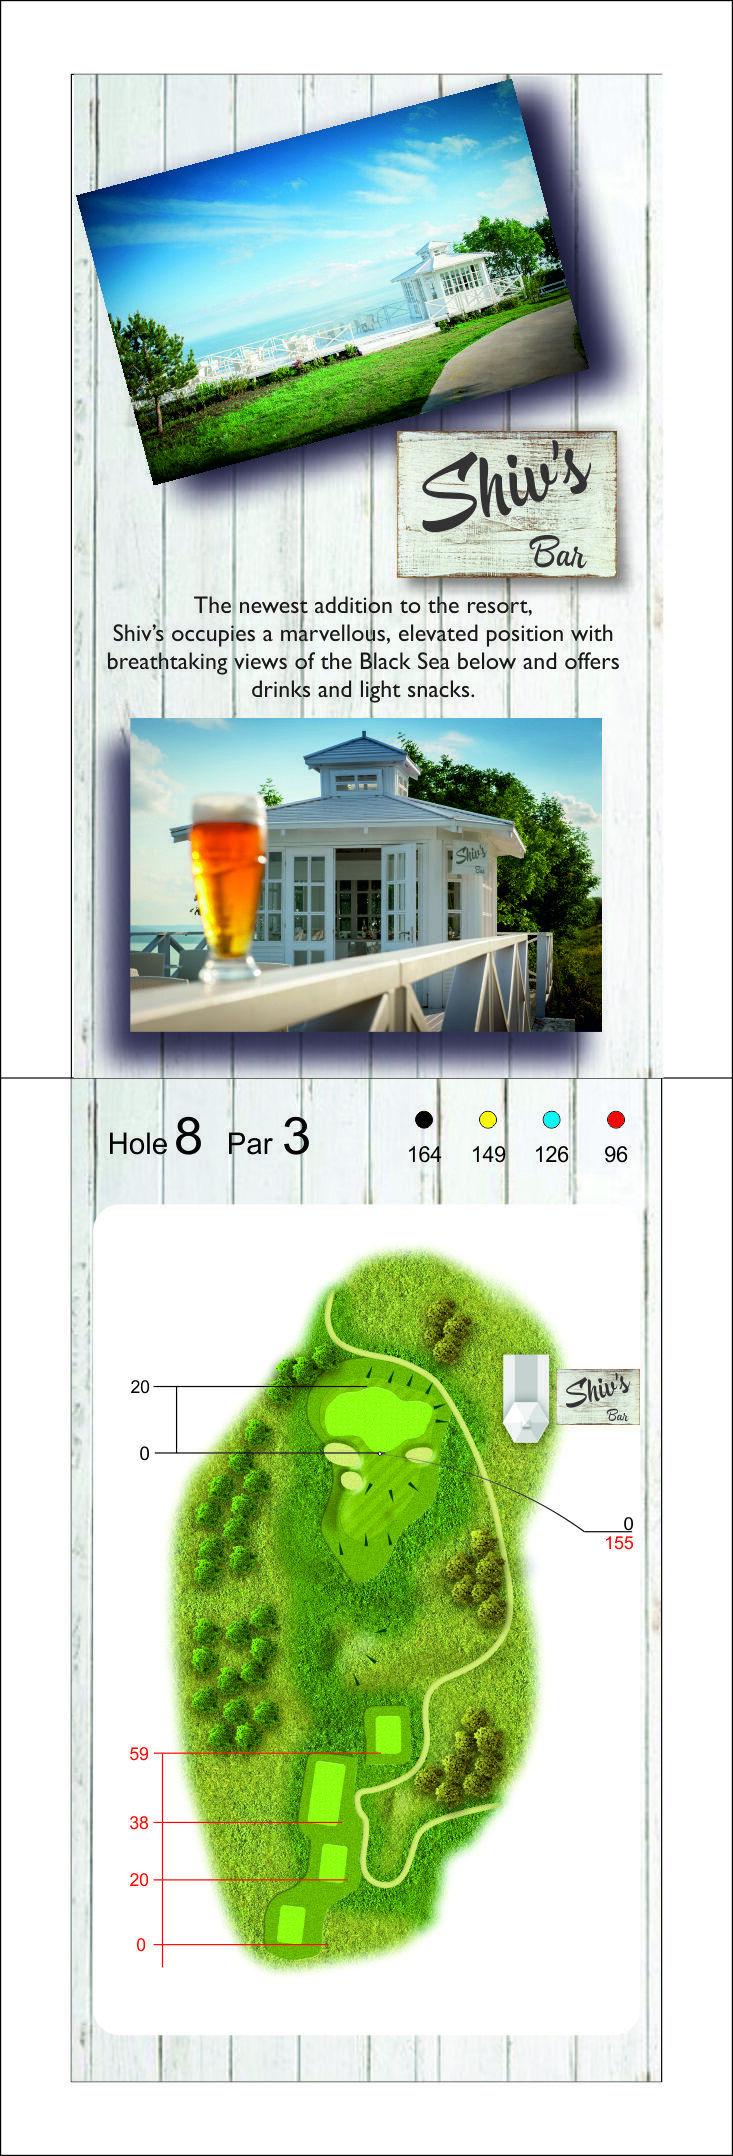
PAR 3 – 149 M
| Color | Par | Meters | Stroke Index |
|---|---|---|---|
| Black | 3 | 149 | 17 |
| Yellow | 3 | 141 | 17 |
| Blue | 3 | 126 | 17 |
| Red | 3 | 96 | 17 |
The shortest hole on the course, but also one of the trickiest. Accuracy from the tee is everything – a short shot leaves a difficult chip up the slope.
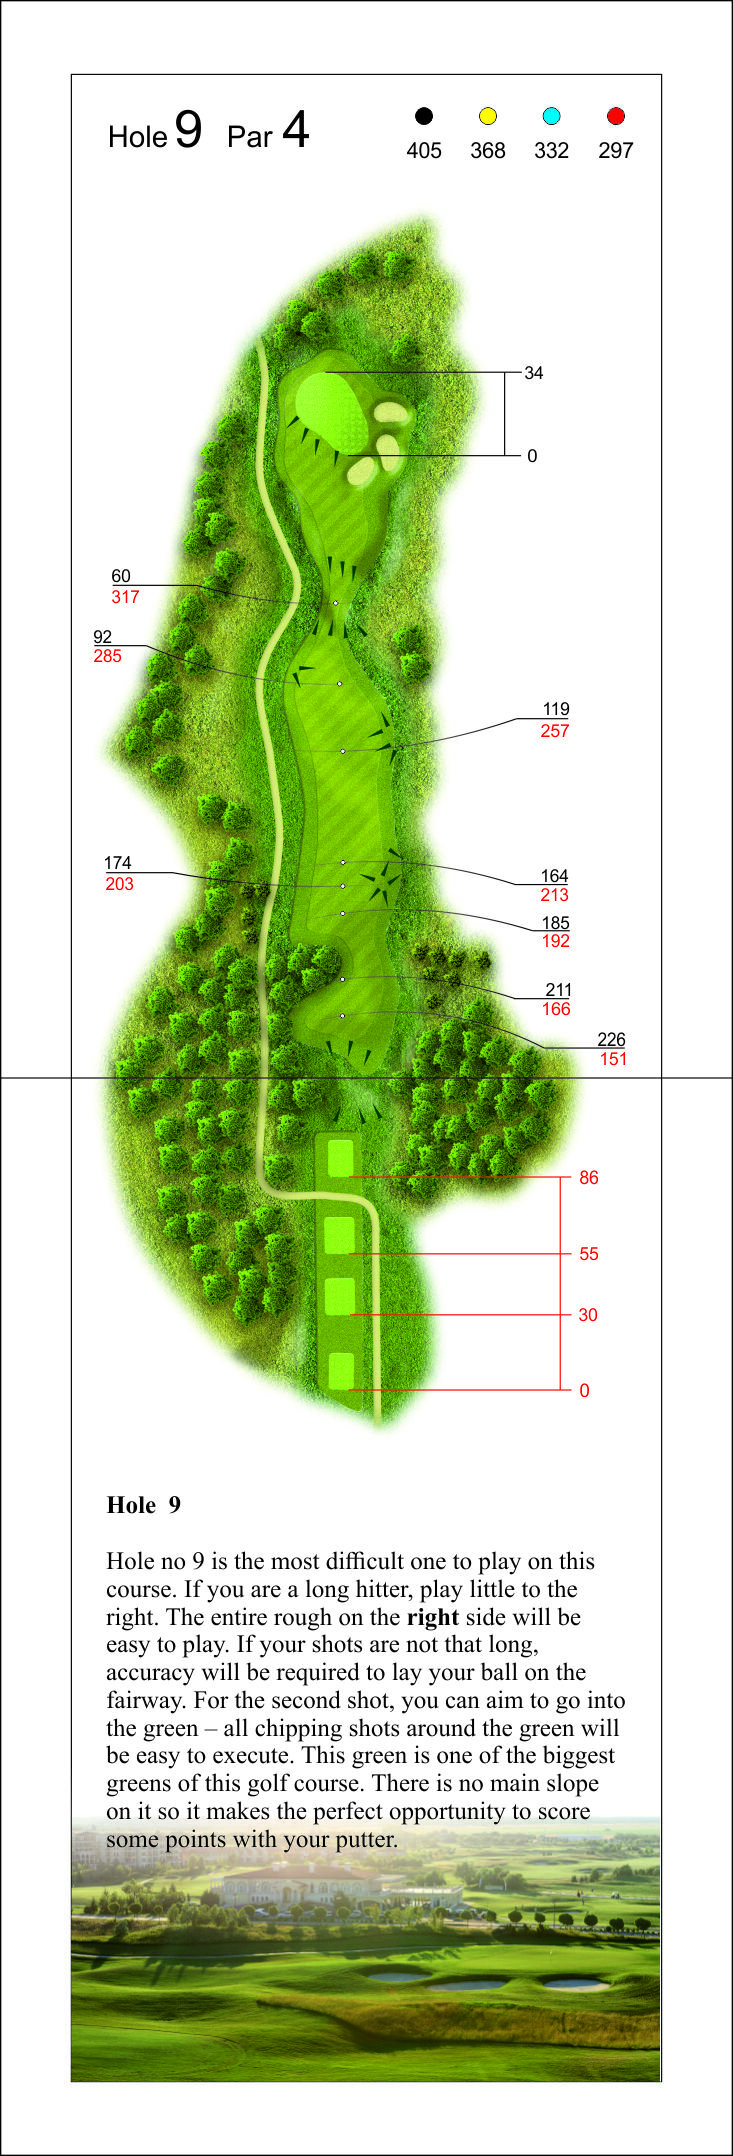
PAR 4 – 405 M
| Color | Par | Meters | Stroke Index |
|---|---|---|---|
| Black | 4 | 405 | 1 |
| Yellow | 4 | 368 | 1 |
| Blue | 4 | 332 | 1 |
| Red | 4 | 297 | 1 |
Hole no 9 is the most difficult one to play on this course. If you are a long hitter, play little to the right. The entire rough on the right side will be easy to play. If your shots are not that long, accuracy will be required to lay your ball on the fairway. For the second shot, you can aim to go into the green – all chipping shots around the green will be easy to execute. This green is one of the biggest greens of the golf course. There is no main slope on it so it makes the perfect opportunity to score some points with your putter.
PAR 4 – 394 M
| Color | Par | Meters | Stroke Index |
|---|---|---|---|
| Black | 4 | 394 | 4 |
| Yellow | 4 | 361 | 4 |
| Blue | 4 | 341 | 4 |
| Red | 4 | 323 | 4 |
The green will be hard to reach in two shots at this hole. First option to play this hole would be to lay up before the first left-side fairway bunker. After that, play a second shot over the right-side fairway bunker. From there you will have only fairway to play your chip into the green. The second option would be to play your first shot close to the bunkers. Aim right-side of the green with your second shot, play a little draw and let the ball roll onto the green. Notice that if you are a bit too long it will be easy to chip from behind the green.
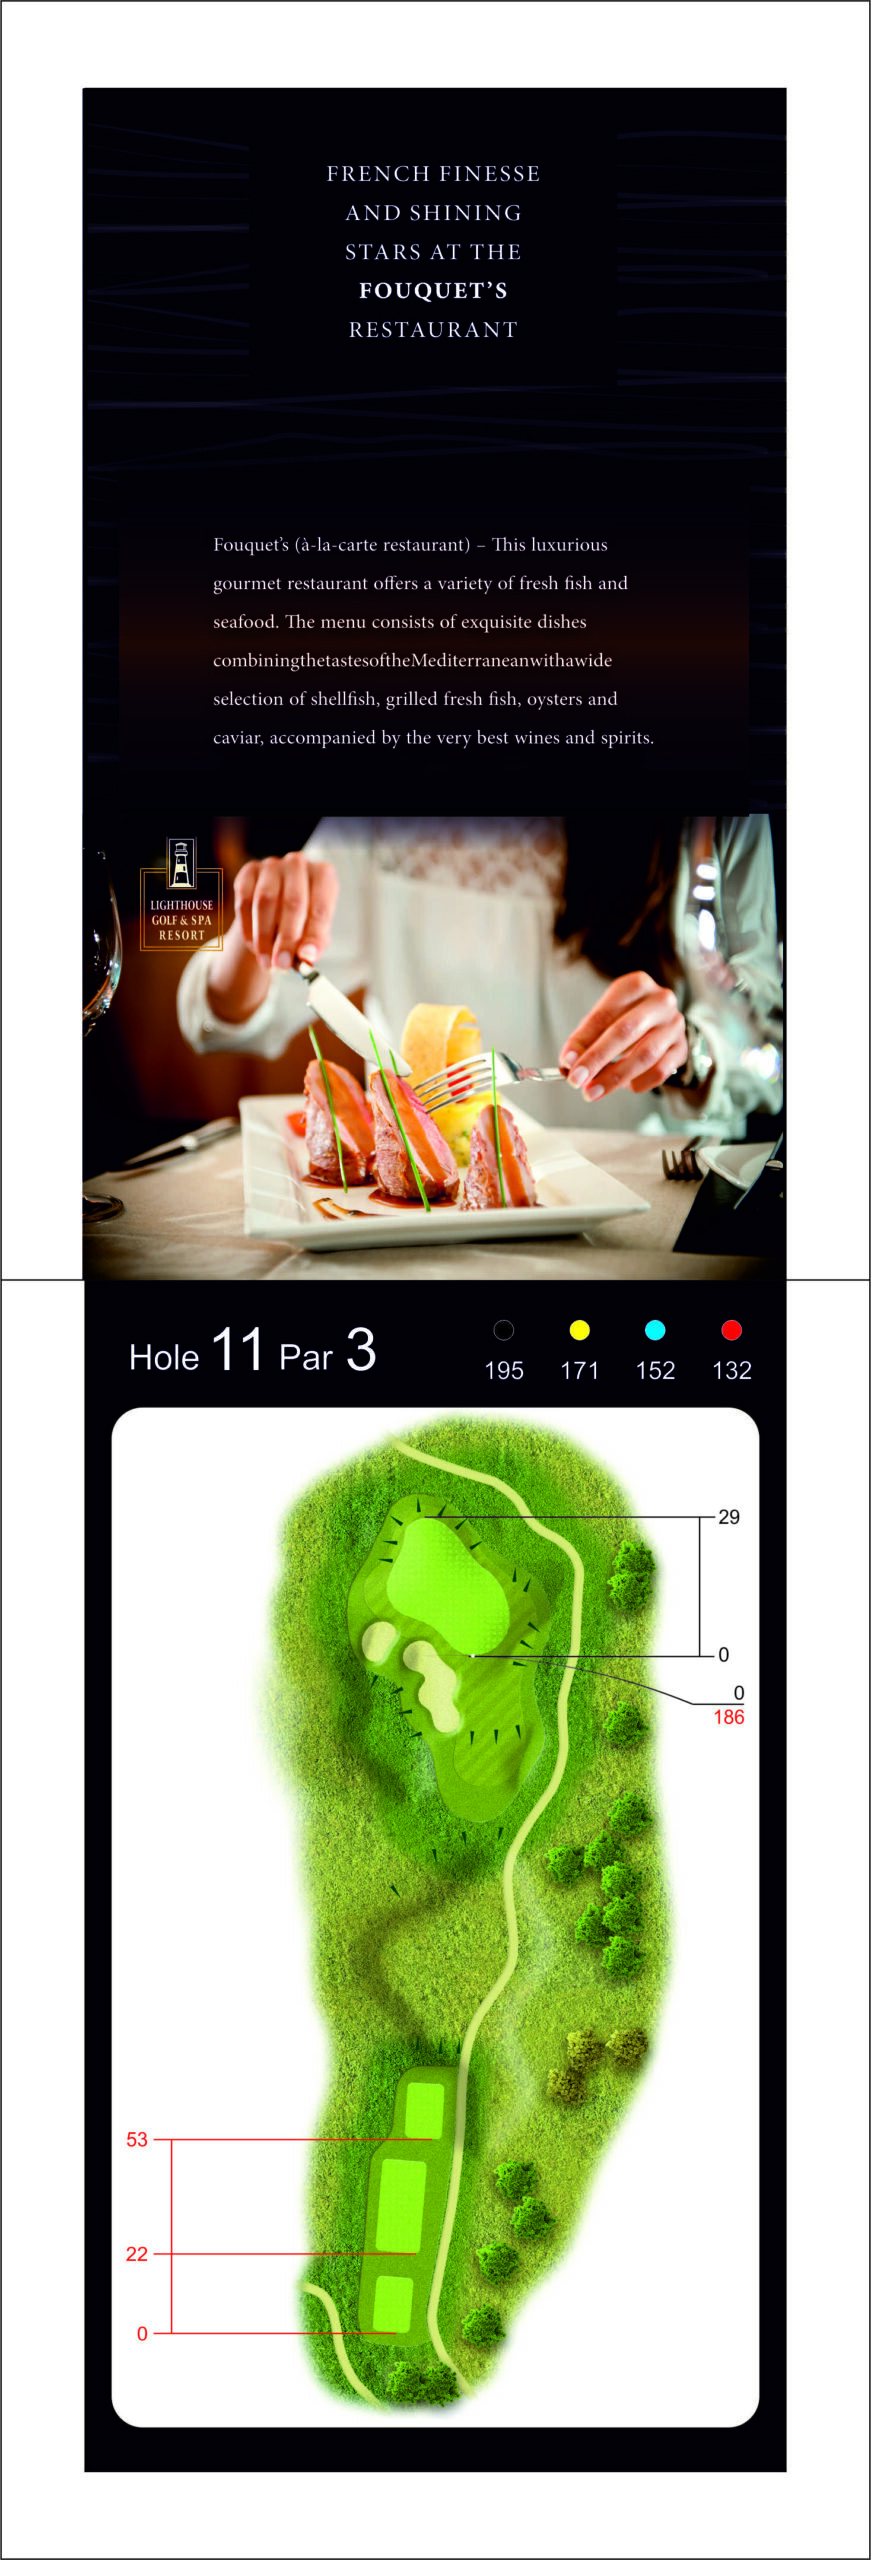
PAR 3 – 195 M
| Color | Par | Meters | Stroke Index |
|---|---|---|---|
| Black | 3 | 195 | 6 |
| Yellow | 3 | 171 | 6 |
| Blue | 3 | 152 | 6 |
| Red | 3 | 132 | 6 |
A long par 3 with an elevated green. Take enough club, as the front is guarded by a deep bunker and the back drops away steeply.
PAR 5 – 509 M
| Color | Par | Meters | Stroke Index |
|---|---|---|---|
| Black | 5 | 509 | 12 |
| Yellow | 5 | 481 | 12 |
| Blue | 5 | 454 | 12 |
| Red | 5 | 432 | 12 |
Aim little to the left when playing your tee-shot. The fairway slope will bring your golf ball to the right-side of the fairway. The rough on the left-side of the fairway is easy to play from and the second shot will be easier to hit. With the second shot it is important to lay the ball at the right distance to the green, then plan to land the ball around the hole as the green is hard. You have two options – play short and aim left of the fairway bunker or play over it and stroke then a short chip around the green. From the left-side the position is the best to have a third shot finishing close to the flag. With the third shot it is important not to finish too long, the rough over the green is thick and to play any shot from there will require good technique.
PAR 4 – 315 M
| Color | Par | Meters | Stroke Index |
|---|---|---|---|
| Black | 4 | 315 | 18 |
| Yellow | 4 | 306 | 18 |
| Blue | 4 | 294 | 18 |
| Red | 4 | 261 | 18 |
You are about to play the easiest hole of our golf course. For long hitters, you can aim to reach the green but any ball laying on the left-side or the right-side will be hard to find because of the rough. Better to finish shorter, between the two bunkers. The second shot from there will be a good occasion to play the ball close to the flag for an easy birdie. The green is soft and you will be able to stop the ball on it easily.
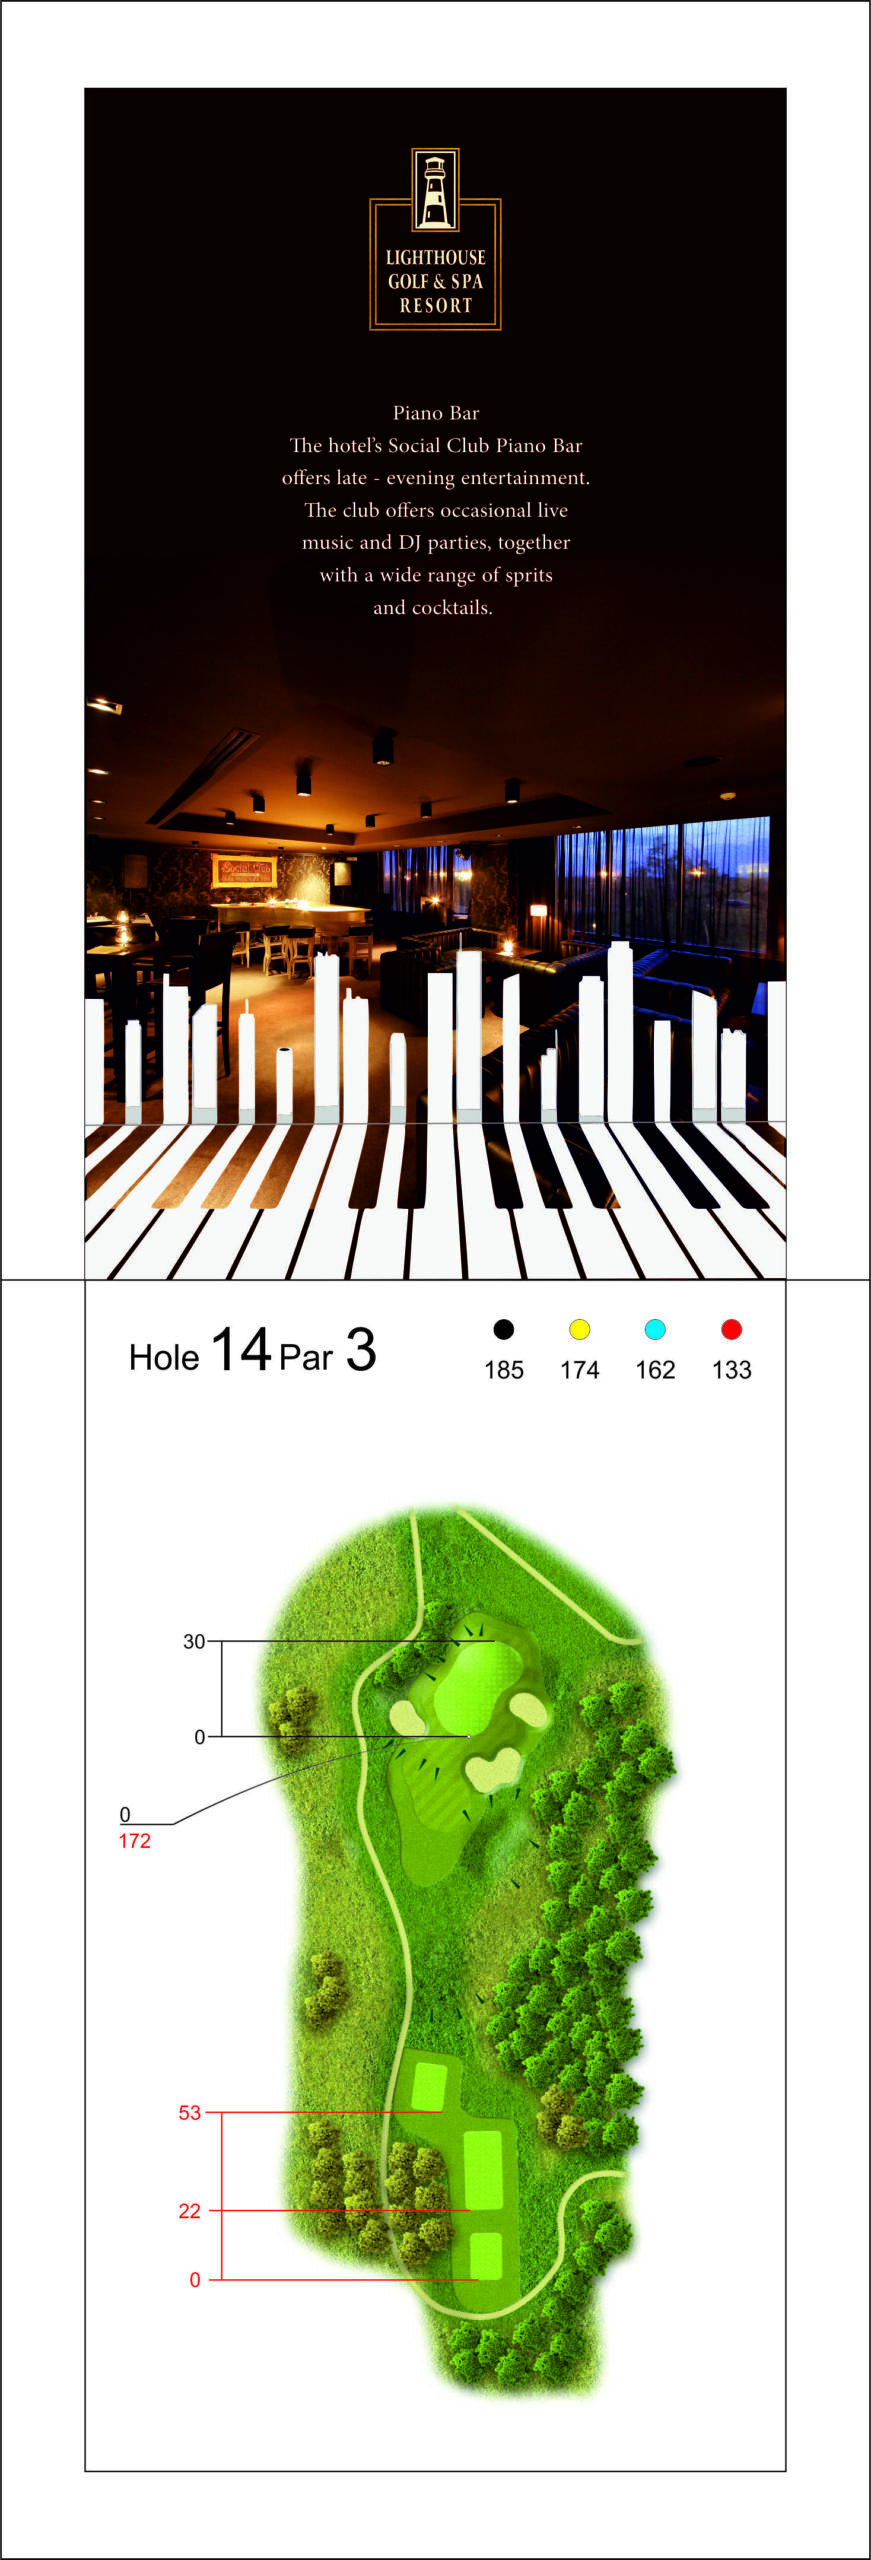
PAR 3 – 185 M
| Color | Par | Meters | Stroke Index |
|---|---|---|---|
| Black | 3 | 185 | 14 |
| Yellow | 3 | 174 | 14 |
| Blue | 3 | 162 | 14 |
| Red | 3 | 133 | 14 |
The tee shot is played entirely over the hollow, with the sea in the background. Aim for the left half of the green and let the ball work to the right.
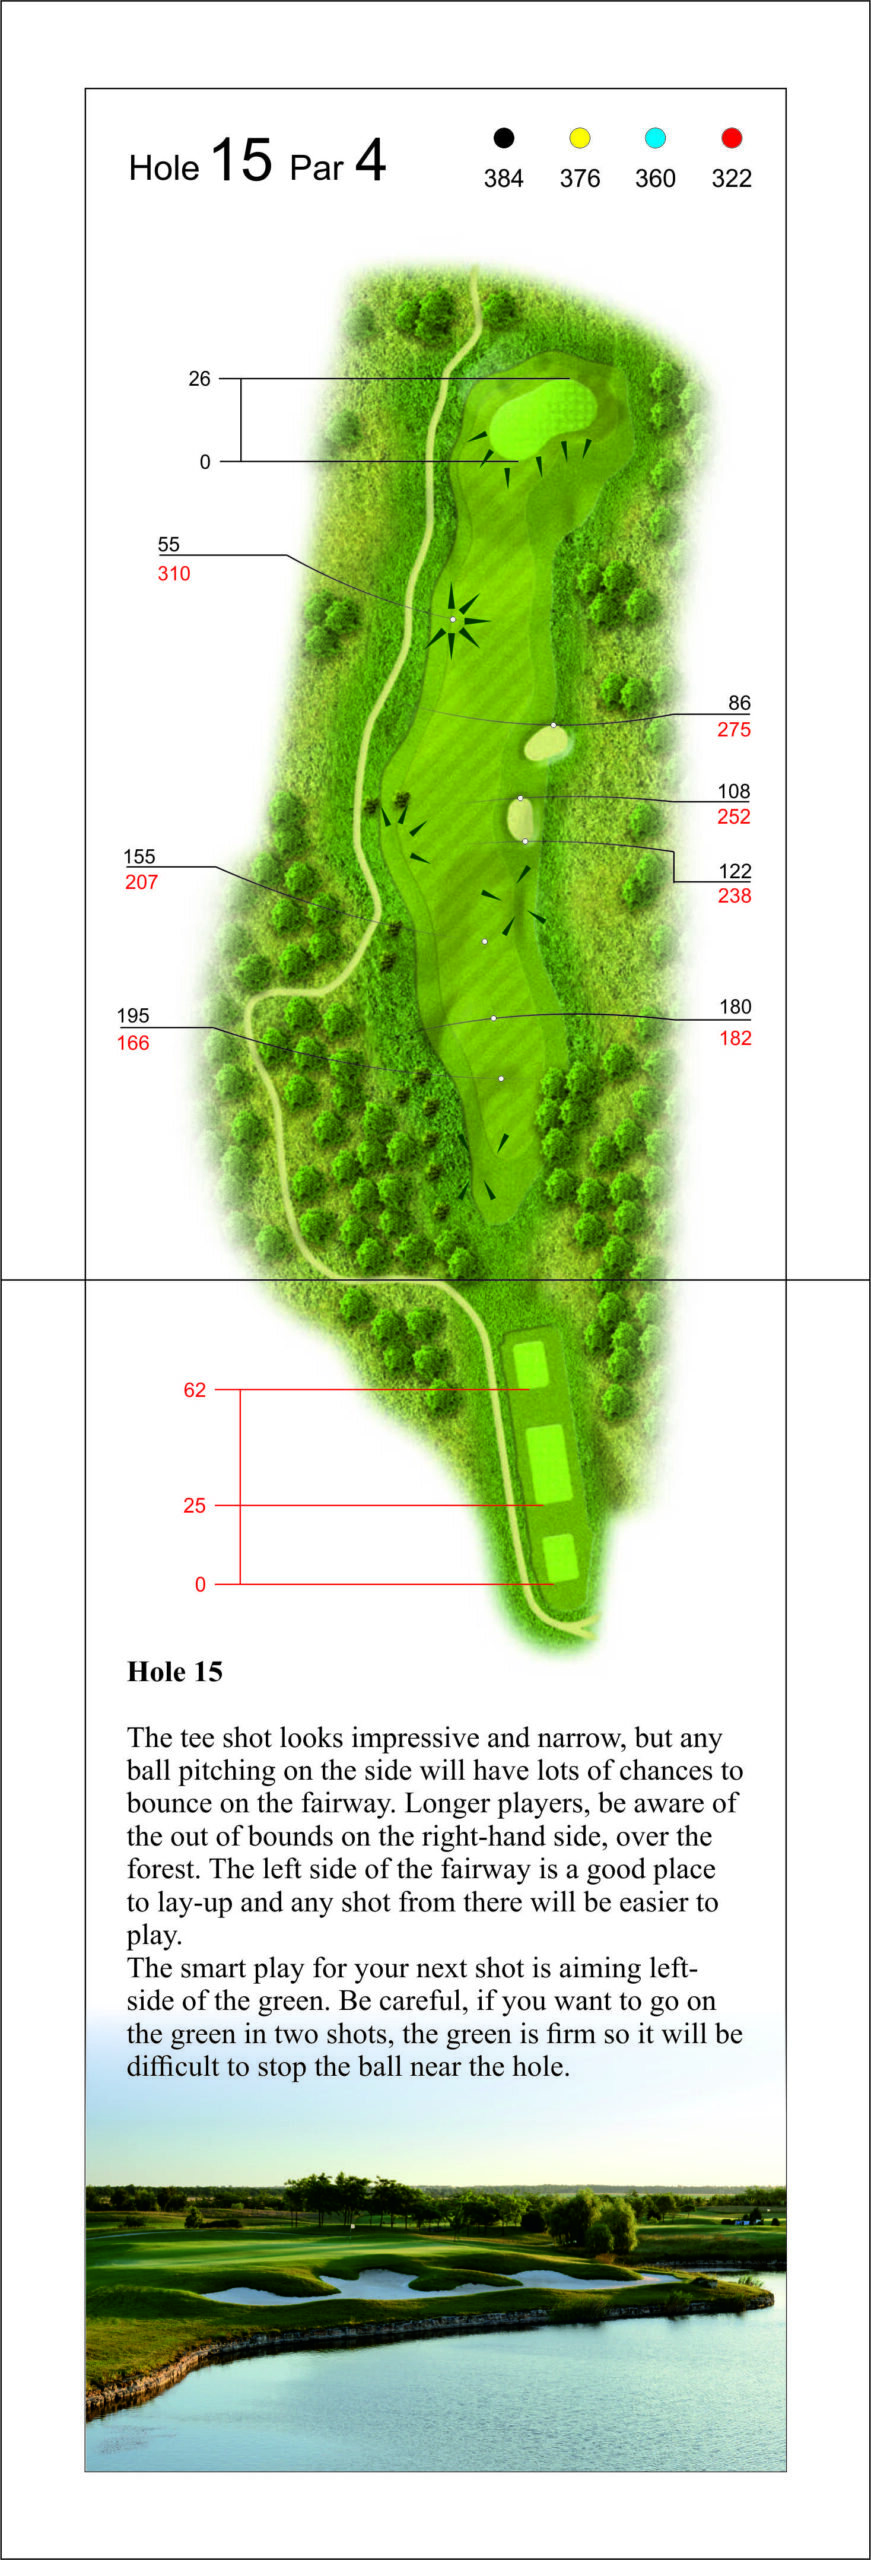
PAR 4 – 384 M
| Color | Par | Meters | Stroke Index |
|---|---|---|---|
| Black | 4 | 384 | 8 |
| Yellow | 4 | 376 | 8 |
| Blue | 4 | 360 | 8 |
| Red | 4 | 322 | 8 |
The tee shot looks impressive and narrow, but any ball pitching on the side will have lots of chances to bounce on the fairway. Longer players, be aware of the out of bounds on the right-hand side, over the forest. The left side of the fairway is a good place to lay-up and any shot from there will easier to play. The smart play for your next shot is aiming left-side of the green. Be careful, if you want to go on the green in two shots, the green is firm so it will be difficult to stop the ball near the hole.
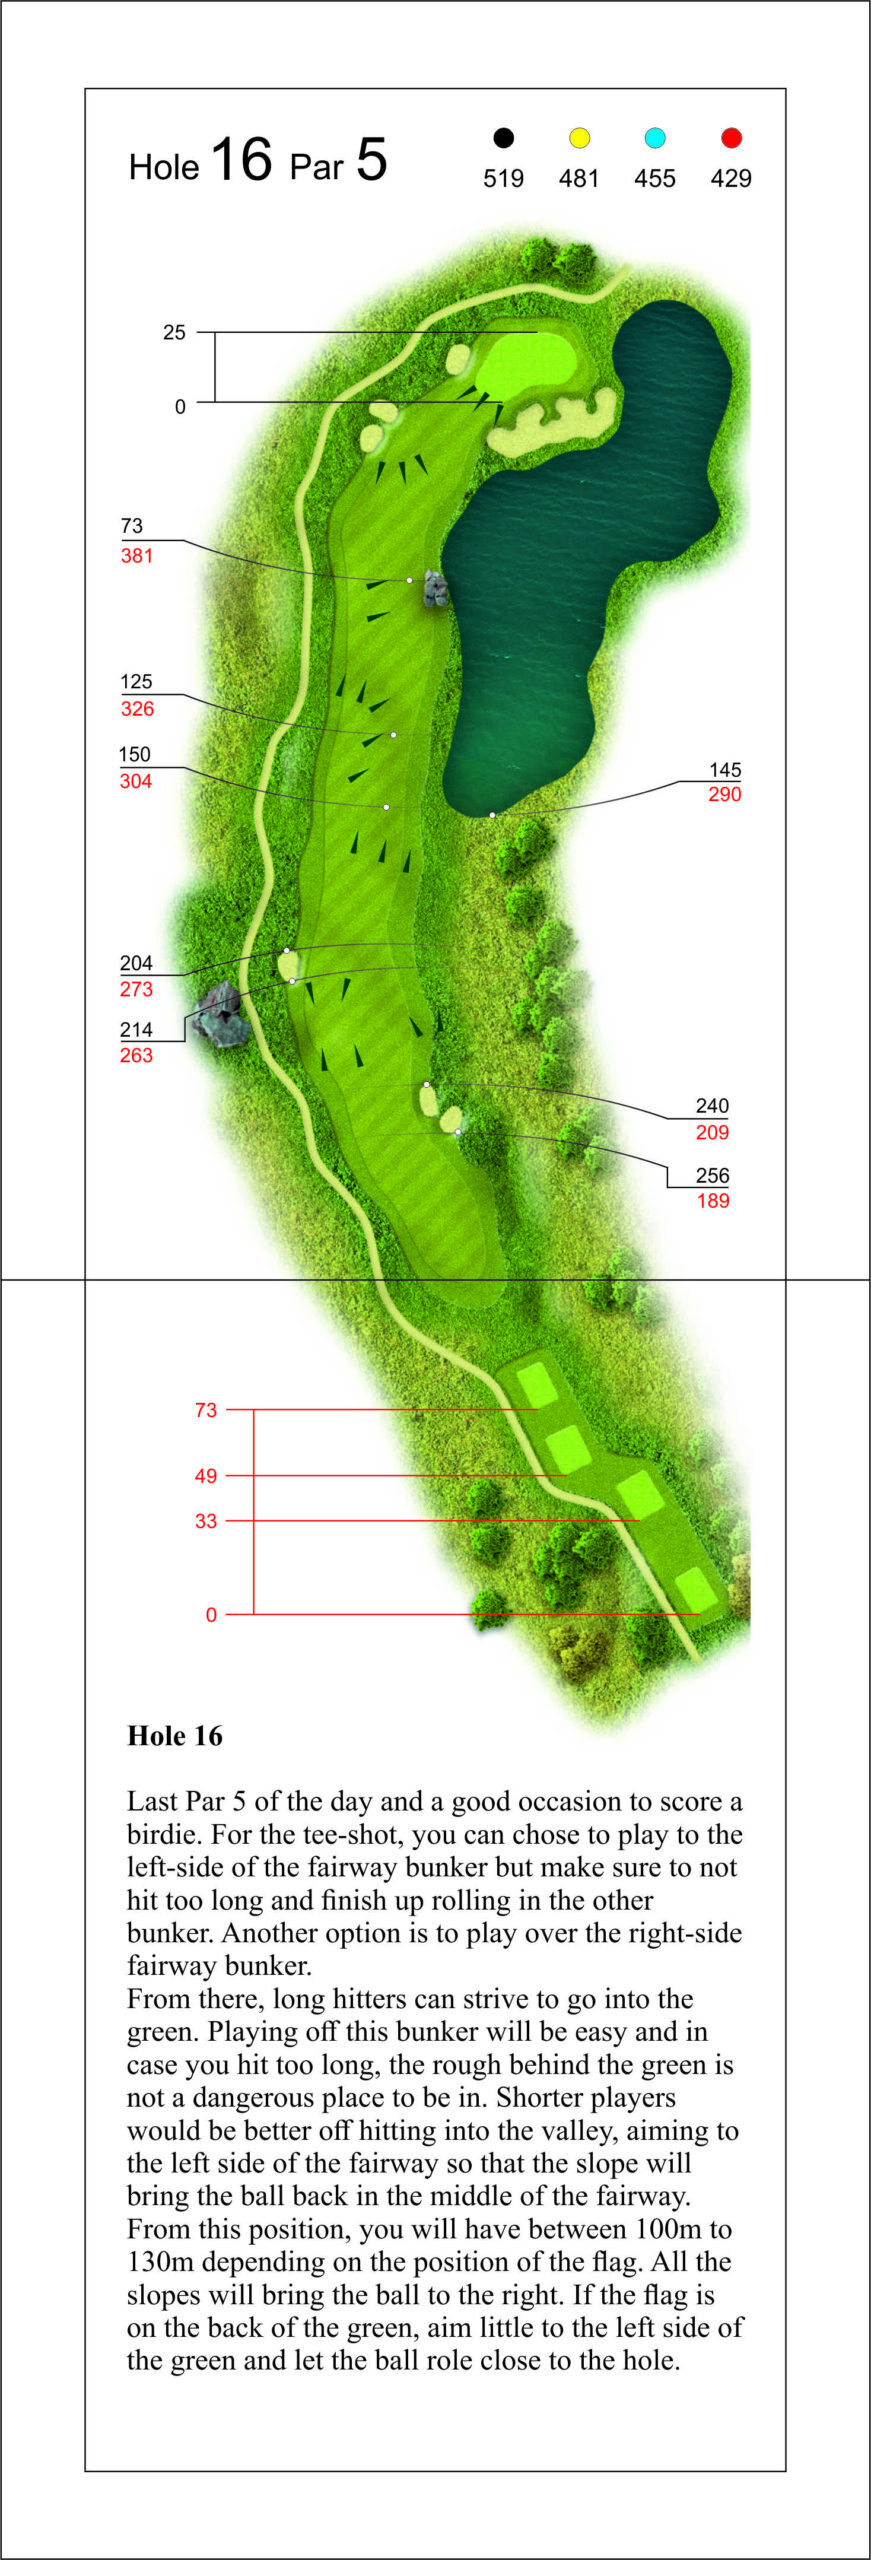
PAR 5 – 519 M
| Color | Par | Meters | Stroke Index |
|---|---|---|---|
| Black | 5 | 519 | 10 |
| Yellow | 5 | 481 | 10 |
| Blue | 5 | 455 | 10 |
| Red | 5 | 429 | 10 |
Last Par 5 of the day and a good occasion to score a birdie. For the tee-shot, you can choose to play to the left-side of the fairway bunker, but make sure to not hit too long and finish up rolling in the other bunker. Another option is to play over the right-side fairway bunker. From there, long hitters can strive to go into the green. Playing off this bunker will be easy and in case you hit too long, the rough behind the green is a dangerous place to be in. Shorter players would be better off hitting into the valley, aiming to the left side of the fairway so that the slope will bring the ball back in the middle of the fairway. From this position, you will have between 100m to 130m depending on the position of the flag. All the slopes will bring the ball to the right. If the flag is on the back of the green, aim little to the left side of the green and let the ball close to the hole.
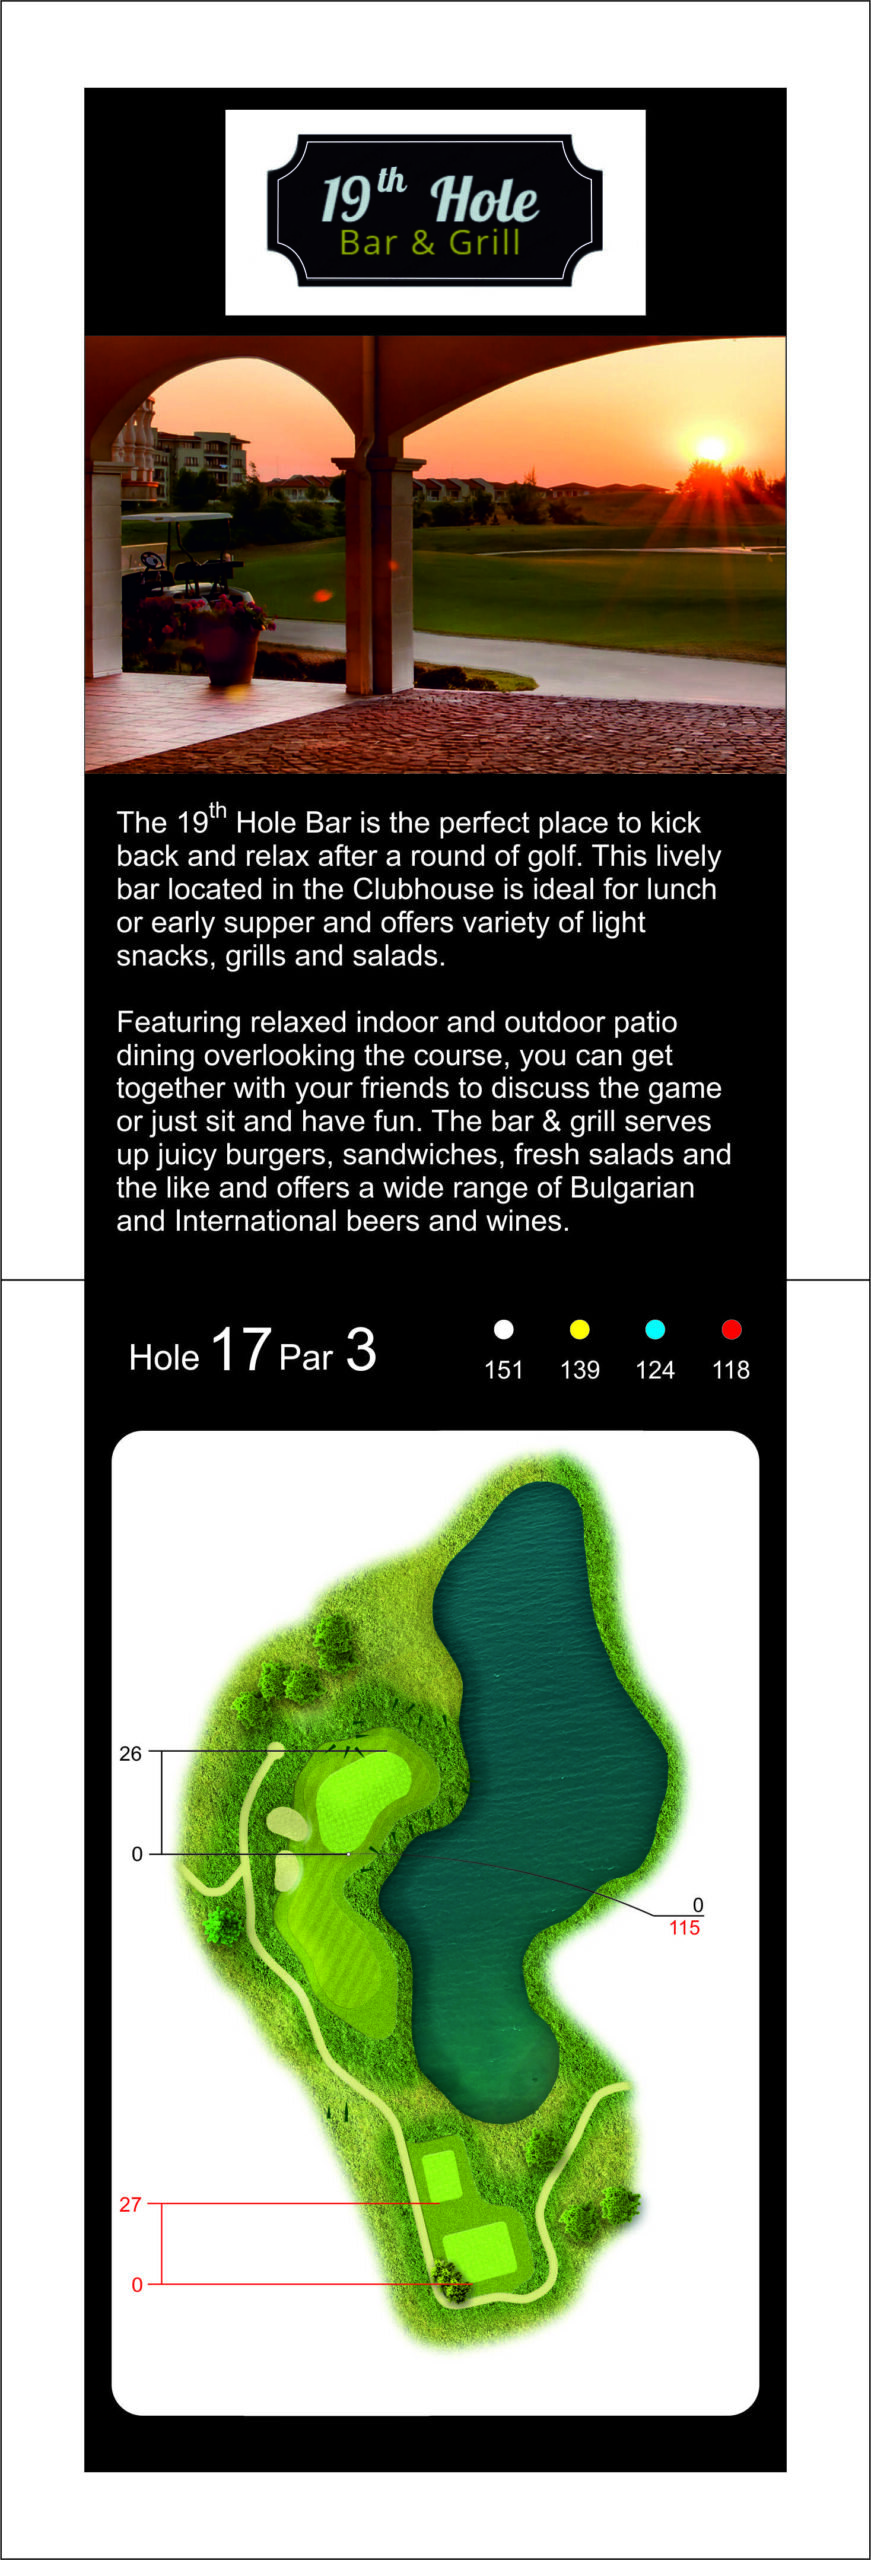
PAR 3 – 151 M
| Color | Par | Meters | Stroke Index |
|---|---|---|---|
| Black | 3 | 151 | 16 |
| Yellow | 3 | 139 | 16 |
| Blue | 3 | 124 | 16 |
| Red | 3 | 118 | 16 |
The last par 3 of the day. The green is wide but shallow – judge the distance carefully and choose your club according to the wind.
PAR 4 – 424 M
| Color | Par | Meters | Stroke Index |
|---|---|---|---|
| Black | 4 | 424 | 2 |
| Yellow | 4 | 393 | 2 |
| Blue | 4 | 369 | 2 |
| Red | 4 | 334 | 2 |
Longest Par 4 to play, therefore playing a good tee-shot is important. Long hitters might finish up in the bunker. The smart way to play for this shot is to finish up short of the right-side fairway bunker. Next, you will have to hit around 180m to go into the green. Taking the position of the flag into consideration you can then decide if to go into the green or not. All the green is well defended with two bunkers on each side. The chip will be hard to lay close to the flag. Shorter players should aim to the left-side of the fairway bunker. Playing the next shot from there will be easier and it offers to you a good chance to score a Par.
Lighthouse Rates
Offering golf lessons, training facilities, and more…





 Christmas is coming!Book Now